The brightly colored crocuses that have made their appearances in our front yard are a very welcome sight! Many have expanded their boundaries into our front lawn. Two weeks ago we had large piles of snow and now ... ah, spring has arrived. Warmer temperatures allow for daily walks outside. Gloves and certainly not boots are necessary today.
That could mean only one thing - last night our outdoor grill was heated!
A tempting grilled cheeseburger with the gooey cheese melting down the sides onto the sesame seed bun tasted so good! Every bite was enjoyed! Devouring cheeseburgers at dinner is not a habit, but the first grilled cheeseburger of the year is always wonderful. Sure, we also ate a large veggie salad, but the cheeseburger was eaten very quickly. :)
With April 1 two days away and word s..n..o..w mentioned, sure glad we used our outdoor grill last night!
We enjoyed!
Yummy!
Wednesday, March 30, 2011
Welcoming Sights!
Labels:
crocuses,
dinner,
exercise,
grill,
oatmeal,
sesame seed,
snow crocuses,
Spring,
walking
Wednesday, March 23, 2011
Time to Make the Yogurt!
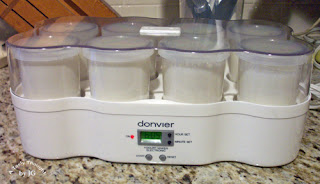
This AM there was one item that definitely needed to be started - the yogurt! Every two weeks my two Donvier Yogurt Makers take their place on my side counter. Each 6 oz. yogurt container is filled with milk that has been heated and cooled with the yogurt culture added. The culture is taken from the previous batch. When any batch tastes a bit strong, it is time to purchase a commercial container of plain, unflavored low fat yogurt to use for the next batch. Then, I start the process, again.
We enjoy Low Fat Yogurt that is ready in about 7 hours and 30 minutes. The easy to follow directions are included with the handy Yogurt Maker. Using 1% Milk, I add a tablespoon of Powdered Milk before the Milk is heated. A very large mixing bowl comes in very handy when preparing Yogurt!
My first Yogurt Maker was a 5 container Salton. For a good 20 years it was put to such great use that suddenly one day it stopped heating. Then, I purchased the 2 Donvier Yogurt Makers. Making a double batch works very well. Regardless if the Yogurt is eaten unflavored or with fruit or jam, this delicious source of calcium is always in our fridge.
The bananas in our fruit bowl are in the "great for eating" stage of ripeness, so tomorrow at lunchtime it's Yogurt with a little Freezer Jam + banana for me. :)
Yummy!
I will enjoy!
Thursday, March 17, 2011
Irish Soda Bread
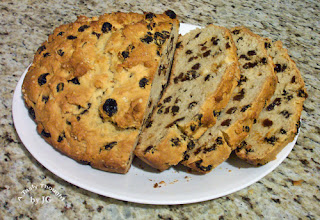
Do you have 1 Cup of Buttermilk in your fridge waiting to be used? One stick of Butter? A little more than 1 Cup of Raisins? If the answers are yes, this easy Irish Soda Bread, can be prepared very quickly. My friend Carol from Charli and Me has shared this recipe many times and it has become a bread that I bake at this time in March. A slice of this very delicious treat, also called Spotted Dog, is enjoyed at breakfast, especially during the week of St. Patrick's Day.
There is a little history - The original recipe is from the Will O'Glenn Irish Bed and Breakfast in Michigan with Mrs. Biddy Gahan sharing it. I can envision a woman in Ireland happily baking this tasty treat for her family early on St. Patrick's Day morning. :)
One year I was searching for such a bread recipe that contained no eggs and little sugar and found this recipe using "Google". It has now become a family favorite! In my family "it's all about the raisins"! Once in my haste I melted & cooled the Butter and then found it easier to mix into the dry ingredients - hence the change.
Irish Soda Bread
Oven: 400°F, then lowered to 375°F
Total baking time: 45 Minutes
Ingredients:
1 and 1/2 Cups Raisins
1 Cup boiling Water
* * *
1 stick Butter - I use unsalted.
2 and 1/2 Cups Flour
1 teaspoon Baking Soda
1 teaspoon Baking Powder
5 Tablespoons Sugar
1 Cup Buttermilk, can be low fat/fat free
Directions:
Enjoy!
Yummy!
Happy St. Patrick's Day!
There is a little history - The original recipe is from the Will O'Glenn Irish Bed and Breakfast in Michigan with Mrs. Biddy Gahan sharing it. I can envision a woman in Ireland happily baking this tasty treat for her family early on St. Patrick's Day morning. :)
One year I was searching for such a bread recipe that contained no eggs and little sugar and found this recipe using "Google". It has now become a family favorite! In my family "it's all about the raisins"! Once in my haste I melted & cooled the Butter and then found it easier to mix into the dry ingredients - hence the change.
Irish Soda Bread
Oven: 400°F, then lowered to 375°F
Total baking time: 45 Minutes
Ingredients:
1 and 1/2 Cups Raisins
1 Cup boiling Water
* * *
1 stick Butter - I use unsalted.
2 and 1/2 Cups Flour
1 teaspoon Baking Soda
1 teaspoon Baking Powder
5 Tablespoons Sugar
1 Cup Buttermilk, can be low fat/fat free
Directions:
- Preheat oven to 400°F.
- Spray a 8" or 9 " Pyrex Pie Plate with PAM.
- In a small bowl combine Raisins and boiling Water. Let sit while preparing dough.
- Melt Butter. Cool.
- In larger bowl, combine Flour, Baking Soda, Baking Powder & Sugar.
- Add melted Butter to dry ingredients, stir in.
- Add Buttermilk, stir.
- Add drained Raisins, stir.
- Shape into a ball after placing dough into pie plate. Dough will be sticky.
- Bake 15 Minutes at 400°F.
- Lower oven to 375°F. Bake 30 Minutes longer.
- Remove the bread from pie plate and cool on rack.
- After cooled, wrap in plastic wrap and aluminum foil.
- Wait at least 5 hours before cutting into slices and eating.
Enjoy!
Yummy!
Happy St. Patrick's Day!
Labels:
bread,
breakfast,
Buttermilk,
easy recipe,
family favorite,
Irish Soda Bread,
raisins,
Spotted Dog
Tuesday, March 8, 2011
Really Easy Cheesy Noodles
Are there times when you have a little extra pasta left after dinner? Intentionally, I prep a bit extra and into the fridge it goes to be used in a side dish later in the week. Easy Cheesy Noodles is a fave in my home. It's an oldie but goodie that I posted here almost 2 years ago.
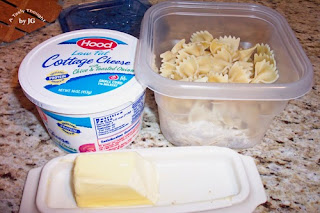
No, it doesn't take long to make, but it sure is a lot quicker if the pasta is already cooked. The precooked/refrigerated noodles need only be combined with a little Butter/Margarine, Pepper and 3/4 Cup Cottage Cheese in a microwave safe container with a cover. Before heating in the microwave, place the cover loosely on top with a little venting. Then, microwave for about 90 seconds. Carefully, stir after heating. Heat 30 seconds longer, if necessary.
The Cottage Cheese will "melt" if overheated. Yes, this can also be heated in a pot on the stove top.
There is usually a carton of "Chive & Toasted Onion" Cottage Cheese in my fridge - for snacking. Combined with the extra pasta at dinner - it's delicious and quick!
Easy Cheesy Noodles became even easier! :)
Enjoy!
Yummy!
Subscribe to:
Posts (Atom)


