Sunday, December 31, 2017

Chicken Chowder


A Steaming Bowl of Chicken Chowder
It's been freezing cold outside!  A big bowl of steaming homemade soup for dinner sounds great.  On Thursday, that was my thought process in the afternoon.  So that's what we had for dinner- a hearty hot bowl of soup!  Most of the ingredients were, well, leftovers from another dinner. 

On Wednesday the family was in town.  It was a FuN time!  After Wednesday's dinner there were many slices of oven baked barbecued Chicken remaining on the serving dish.  There was also a small amount of mashed potatoes.  One other food we always have whenever they are in is Kraft Mac and Cheese.  I'm not sure how, but yes, there was a bit remaining, too.  Nothing else. 

As I was deciding what to prepare for dinner, the happy memories of Wednesday reminded me that we did have a few leftovers in the fridge.  This could be the start of a hearty soup on a cold winter night.  And it was!

It did not take long for me to combine Chicken Broth with about 1/2 Cup of Mashed Potatoes in a small soup pot.  About 1 Cup of frozen Mixed Veggies were add to the mixture along with dehydrated Onion, Parsley and also Basil.  After cooking the vegetables in the broth mixture for 11 minutes, about 1 Cup of cooked Chicken chunks were added and stirred in.  Then about 1/2 Cup of the prepared Kraft Mac and Cheese.  To make this soup a little creamier, I added in 1/2 Cup of Milk.  What a delicious soup!  The macaroni that was coated with cheese gave the soup a great taste.  I wanted it a little creamier, so I added in 1/2 Cup of Milk. 

WoW!  This very tasty hearty soup was prepared mostly from leftovers.  Who would have guessed that soup would be on the menu the following night?  Soup that was prepared with, well, foods that were just waiting in the fridge!  So good! 

Chicken Chowder 
     2- 3 Servings

Ingredients:
1 can Chicken Broth (I use 14.5 ounce can College Inn Light and Fat Free Chicken Broth)
1/2 Cup Mashed Potatoes
1 Cup frozen Mixed Vegetables
1 Tablespoon Parsley
1 Tablespoon dehydrated chopped Onion
1/2 teaspoon dried Basil
1 Cup cooked Chicken- cut into small chunks
1/2 Cup cooked (Kraft) Mac and Cheese
1/2 Cup Milk

Method:
  1. In a small Dutch Oven/ Soup Pot combine Chicken Broth with Mashed Potatoes. 
  2. Stir and bring to a simmer.
  3. Add frozen Mixed Vegetables, Parsley, Onion & Basil.  Cook for 11 Minutes or until vegetables are done.
  4.  Add cooked Chicken chunks and Kraft Mac & Cheese.  Stir.
  5. Add 1/2 Cup Milk and stir.  Soup will be creamier.
  6. Heat another 4- 5 Minutes.
A bowl of this hot soup tasted so good on that cold night! 

Enjoy!
Yummy!
          

Thursday, December 21, 2017

~Best Ever Sour Cream Sugar Cookies~

Best Ever Sour Cream Sugar Cookies
(File Photo)
Today I made the batter for my traditional Christmas Cookies!  They are just so good.  For years I've baked these cookies.  Well, the years all add up to over 40 years, now.  The dough contains a hint of nutmeg and also sour cream.  As I write this, the double wrapped cookie batter is in the fridge.

These cookies are not only "just the best", they are an easy 2 day process.  On Day 1 the dough is prepared and refrigerated.  Then, on Day 2 a rolling pin, mat and cookie cutters are given a workout.  On baking day find your colored sugars for decorating.

Rolling out the dough!
(File Photo)

***I always use unsalted Butter when preparing the dough.  The dough is much easier to roll out when using Butter.        

There's always a little "taste test" going on after the first tray of these cookies have been taken out of the oven and they've cooled a bit.  Most of the batch will be packaged/ labelled and frozen for next week.  Yes, these cookies freeze very well.  I usually also place 6 in a small Ziploc Freezer Bag to freeze.  It's a great treat on a cold winter day to find this treasure in our freezer.

This recipe makes about 5 dozen Best Ever Sour Cream Sugar CookiesClick here for the recipe.   Look no more for a tasty sugar cookie recipe.  This one has a hint of nutmeg and sour cream.

Enjoy!
Yummy!
      

Saturday, December 9, 2017

~December 9, 2017~

~Home Sweet Home~

Just a quiet Saturday afternoon in New England on a December day! 

Enjoy!

Friday, December 8, 2017

~2017 Yuletide at Storrowton~

Admiring the beautiful Christmas Tree!
Yuletide at Storrowton is a great event in my area of Western MA!  We went last weekend!  The weather was co-operating, so we drove over the Connecticut River to West Springfield (in MA).  Walking onto the grounds of this 19th century New England village brings us back in time to a period of our American history when so many every day items were hand crafted.  The buildings on the grounds are original and moved to their present location at Storrowton Village.


The Meeting House was our first stop!  A Meeting House was used for Town Meetings and also for worship.  It was our first stop!  The fruit decoration above the doorway was beautiful and not often seen these days.


Once inside sitting down, we had the opportunity to listen to Folk Music from the 19th century!

19th century Folk Music Performers
 Then, onto the Blacksmith Shop!

Needed tools the Blacksmith had crafted.    
He stopped his work to answer the numerous questions we all had.  

Pounding the red hot metal to a needed shape.
Inside the Lawyer's Office we saw simple, yet elegant tree decorations.  The trees were made of folded gold paper with a dowel in the center.  I took note of this easy, beautiful decoration.  Local area garden clubs create the floral arrangements.  These arrangements are on view for all of us to get new decorating ideas.  :)

Visit to the Lawyer's Office
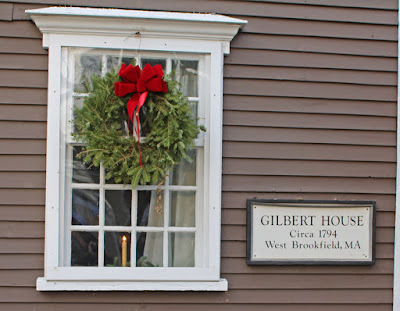
Walking a little further down the path, we visited the Gilbert House.  There was a candle in the window!

  
Once inside, we visited with a lady spinning yarn.  The Kitchen was in the next room.  Then, we enjoyed the Parlor.  

There were so many beautiful decorations to admire while visiting Storrowton Village!
 
Beautiful Decoration!
Once inside the Schoolhouse a gentleman described the education during this time period.  In this Schoolhouse the blackboard was on 3 walls.
  
The Schoolhouse!
Our last stop on this wonderful journey back to the 19th century was to chat with a craftsman who made paint brushes.  

Craftsmen Making Paint Brushes!
It's always fascinating to visit Storrowton Village!  This week there are tours and special "Lantern Light Tours" of the Village taking place.  This is an event we always put on our calendar!  I know you have enjoyed this tour back to 19th century New England!

Enjoy!
     

Sunday, December 3, 2017

~Knitted Penguins~


Knitted Penguins
It's the beginning of December.  You may have knitting needles in many sizes just waiting to be picked up and start clicking away.  You may have white or blue, green or red yarn sitting in your "yarn stash".  There may be even a skein of black yarn.  If you don't have black yarn, put it on your "must buy" list!  These adorable Penguins are just too cute to resist knitting, if you like to knit!!!

Last year I surprised my older two grandsons with these cute little guys.  One grandson likes anything and everything relating to Penguins.  I used a Red Heart yarn pattern that I had found on Twitter.

Click here for pattern.

JOANN's had the needed buttons to securely sew on the faces.  Using a small piece of Bias Tape the buttons were sewn on much easier.  They are also more secure!

Securely sew on buttons!
Each Penguin has a jersey body liner that's stuffed & then placed inside the knitted body.  This body liner prevents any stuffing from seeping out of the knitted body.

Stuffed Jersey Liner to place inside Penguin.
The Penguin body is knitted.  The flippers and scarves are knitted separately.  I tacked the scarf onto the Penguin, completely, so it will never move.

***Push in the bottom of the completed Penguin, if you want it to stand up.  

This amigurumi Penguin is a cute gift for some lucky recipient!  

For my complete post from last year on creating these adorable knitted Penguins, click here.  These little amigurumi are just so cute!!!

Happy Knitting!
    

Saturday, November 25, 2017

~Turkey a la King~

Turkey a la King
(File Photo)
Is there leftover Turkey from your delicious dinner on Thursday?  Or maybe just a little is remaining.  It's a great opportunity to make Turkey a la King for dinner!  You probably have all of the ingredients already.  This is so similar to a Turkey Pot Pie.  However, there is no need to roll out or purchase a pie crust.  A creamy sauce filled with small bites of turkey along with mixed vegetables served over toasted bread.  Now, that's what I call easy.  That's also what I call yummy!

So, find your can of Chicken Broth, Milk and package of frozen vegetables to prepare this for tonight's dinner.  :)

Turkey a la King
     Serves 2- 3 people 


Ingredients:

1/4 Cup Margarine/ Butter (I use unsalted.)
1/3 Cup Flour
1 Cup Chicken or Turkey Broth
      (I use College Inn Light & Fat Free Chicken Broth.)
1 Cup Milk
1 Cup Turkey chunks (cooked), cut up, more if desired
 2 Cups cooked Carrots & Peas (or Mixed Vegetables)

*****
Sliced Bread, Toasted, 1- 2 slices/ person

Method:
  1.  Melt Margarine/ Butter in large skillet/ large pot.
  2.  Remove skillet from Medium heat and slowly stir in Flour.
  3.  Return to heat and slowly add in Chicken Broth & Milk while slowly stirring constantly.
  4.  Continue stirring over heat until sauce is thick and bubbly. 
  5.  Add cooked Turkey chunks.
  6.  Add in cooked vegetables.
  7.  Stir and heat mixture for 1 - 2 Minutes.
  8.  Serve over toasted Bread.
There's always some Cranberry Sauce on our table to enjoy while having this at dinner!  It's easy and delicious!   

Enjoy!
Yummy!
     

Wednesday, November 22, 2017

The Journey of the Mayflower


Learning a little more history is always fascinating!  The Cape (Cape Cod) is a beautiful area in my state of Massachusetts.  Whenever we stop in to the town of Chatham, MA, it's always interesting to read and review a little history.  The area across from the Chatham Lighthouse is not only scenic, there is an interesting plaque to read.

A few years ago in November of 2012, I wrote a post about the history and the voyage of the Mayflower.  I find that it is still a favorite read.  What better time than during Thanksgiving Day week is there to share it again?

"The Journey of the Pilgrims" 

Enjoy!


I wish you all
a Happy Thanksgiving Day
and weekend!!!  

Monday, November 20, 2017

Butternut Squash Bread

Butternut Squash Breads cooling!
(File Photo)
It is a tradition!  Every year I bake Butternut Squash Bread to enjoy during the Thanksgiving Day weekend!  Years ago, I used a Pumpkin Bread recipe & replaced the pumpkin with Butternut Squash!  Then, I started using Egg Whites rather than Whole Eggs when preparing my breads.  Before I knew it, I replaced Olive Oil for baking & sauteing for the vegetable oil.  The result?? A yummy cinnamon flavored Butternut Squash Bread that has a hint of Nutmeg!  It's become a tradition to enjoy this bread over the Thanksgiving Day weekend. 

This bread also freezes very well.  Usually, I bake 2.  One is enjoyed for the next few days & the second bread is wrapped in foil & placed in our freezer.  It's already baked!  What a tasty bread!  1 cup of cooked/ mashed Butternut Squash makes a very delicious bread!  

Butternut Squash Bread

Oven Temperature:  350°F       Baking Time:  55 Minutes

Ingredients:

1 and 1/2 Cups Flour
1/2 teaspoon Salt
1 teaspoon Baking Soda
1 teaspoon Baking Powder
1 teaspoon Cinnamon
1/4 teaspoon Nutmeg
1 Cup Sugar

4 Egg Whites (=  total of 2 Whole Eggs)
3/4 Cup Olive Oil for baking & sauteing
1 Cup Butternut Squash, cooked/ mashed/ cooled- defrosted if frozen
PAM

Method:
  1. Spray 1 large bread pan with PAM. 
  2. Preheat oven to 350°F.
  3. Combine all dry ingredients in large bowl. 
  4. In smaller bowl, beat Egg Whites until frothy.
  5. Mix in Olive Oil.
  6. Add mashed Butternut Squash to Egg White/ Olive Oil mixture.
  7. Pour liquid mixture into dry ingredients.  Stir until combined.
  8. Pour batter into bread pan.
  9. Bake at 350°F for 55 Minutes, or until cake tester/ toothpick comes out clean when inserted in middle of loaf.
  10. Cool in pan on wire rack for 10 Minutes. 
  11. Then, remove from pan.
  12. Continue cooling on wire rack.
  13. Later, place on a serving dish & cut into slices.
We always enjoy the first slice later in the day that this bread is baked.  If, you can wait until the next day to sample it, the flavors combine even more.  We never can wait for the next day to sample!  Yes, it is that yummy!

Can you substitute canned pumpkin?? Yes.  However, Butternut Squash Bread is just the best!

Enjoy!
Yummy!


Tuesday, November 14, 2017

~Freezing Butternut Squash~

Mashing the Butternut Squash


The annual ritual of freezing Butternut Squash to enjoy the other months of the year is in full swing!  This delicious orange vegetable is such a great treat at dinnertime.  It's great to be able to purchase the fresh local vegetables in autumn at local roadside stands.  With a little prep work this veggie can be frozen, then reheated, for a great side dish during the year!

Ready for our freezer!
I freeze 2 Cups of this mashed veggie in each Quart sized Ziploc Freezer bag.  While preparing dinner it's easy to remove the frozen mashed Butternut Squash from the bag and place in a Corningware dish.  Place the cover on top.  In our microwave it is defrosted/ reheated in ~14 minutes.  The steaming hot vegetable is served in the same baking dish.

There are also many other ways that we enjoy Butternut Squash!  For me it requires only walking down the stairs to open our large freezer.  The bags of Butternut Squash are waiting on the second shelf!

This is the time of year when we find these orange colored squash plentiful in the grocery stores.    

Click here for complete directions on preparing Butternut Squash for the freezer. 

Enjoy!
           

Friday, November 10, 2017

~Veterans Day~

The Homecoming G.I."
Norman Rockwell
THE SATURDAY  EVENING POST Cover
(May 25, 1945)

Thank You to all of our Veterans!!!

Tuesday, November 7, 2017

The word is...


incredible!  It's November and our beautiful pink Roses are still blooming!   

We are enjoying the beautiful color.

Tuesday, October 31, 2017

October 31-


HappHalloween!!!

Enjoy!
 

Sunday, October 22, 2017

October Color


On the daily walk in our neighborhood it's always great to look- up!  Suddenly, during the month of October the leaves begin to change!  Now, the beautiful colors of autumn are becoming visible.  The golden yellows, the rust colors & the subdued reds along with orange leaves on trees.  All colors are mixed in with many shades of green. 


Every day it changes, just a little.  Everything is a little more colorful. 


The brilliant colors appear & before we know it, they change color, again.  The dried leaves start floating downward.  Autumn in New England is beautiful!

Enjoy!

Thursday, October 19, 2017

~Flatbread Pizza~

The last slice of Grilled Pork Tenderloin Flatbread Pizza!
You are planning on Flatbread Pizza for dinner.  Pork Tenderloin was grilled last night & there are a few slices remaining.  A Green Pepper & Zucchini are in the fridge.  Ricotta Cheese & shredded Cheese are quickly found there, too.  Oh wait, the Zucchini is not fit to be used.  Need to toss it!  There is a change of plans!  No, not take out!  A quick glance in the fridge & a ripened Pear is just waiting. 

You guessed it.  This was going on last night.  Plan B was that the Green Pepper & Pear were sliced/ roasted & placed on the Flatbreads.  We enjoyed another variety of Flatbread Pizza! 

While you are roasting the Green Pepper & Pear, get the other ingredients ready.  Before you know it, it will be time to toast the Flatbreads for 2 Minutes in the oven.  Then, the ingredients are placed on top & you will be ready to place them in the oven.

These are so delicious!  They are also quick & easy to prepare.  For 2 servings, I use 3 Flatbreads.  The Ricotta Cheese is always spread on the toasted Flatbreads, first.  Then roasted veggies (fruit) & grilled Pork or Chicken.  Diluted BBQ sauce that's drizzled on top gives it extra flavor.  Then, sprinkle on the shredded Cheese!  Bake for 5 Minutes.
  
***Roasting Veggies:  Rinse Green Pepper & Pear under cold running water, pat dry.  Cut the Pepper into strips.  Then, cut the Pear into strips about 3/4" wide.  After coating with baking & sauteing Olive Oil, Garlic Powder, Basil & Oregano, roast in a 450°F oven for 15 minutes.

Grilled Pork Tenderloin Flatbreads
     For 2 Servings

Ingredients:
Flatbreads- I use 3.
Roasted Green Pepper & Pear strips
1/4 Cup Ricotta Cheese (can be fat free) for each Flatbread
Grilled Pork Tenderloin- cut into chunks
4 teaspoons BBQ Sauce
1 teaspoon water
Shredded Cheese- desired amount

Method:
  1. Place (3) Flatbreads in a large cookie pan & bake in a 375°F Oven for 2 Minutes. Remove from oven. 
  2. Spread about 1/4 Cup Ricotta Cheese on each.  (I use Fat Free.)
  3. Place roasted Green Pepper & Pear strips on Flatbreads.
  4. Add Grilled Pork Tenderloin that's cut into chunks.
  5. In a small cup combine 1 teaspoon water with 4 teaspoons BBQ Sauce.
  6. Drizzle BBQ Sauce mixture over Flatbreads. 
  7. Sprinkle desired amount of Shredded Cheese on top.
  8. Bake for 5 Minutes at 375°F.
  9. Remove from oven.
  10. Cut each Flatbread Pizza on a diagonal, into 3 pieces.
  11. Cover & refrigerate any leftovers. 
Last night one slice remained after dinner.  It was also the slice that contained the least amount of ingredients.  No problem.  It was part of my husband's lunch today.

Enjoy!
Yummy!
              

Sunday, October 15, 2017

Cheesy Eggplant Parmesan

Cheesy Eggplant Parmesan ready for the oven!
Eggplant Parmesan with Spaghetti is just so good!  In days past I enjoyed ordering this entree when we dined at an Italian restaurant.  Then, I decided to stop eating the batter dipped fried Eggplant slices.  It's not that they were not totally delicious, I didn't want to eat fried foods.  Now, I enjoy preparing this entree, but I bake it.  Actually, double bake the Eggplant.  Whenever I bake a batch, extra portions are packaged/ labelled/ dated for our freezer. It's a great take- out dinner from my kitchen!

I've been baking this for a while, but now I've also changed my original recipe.  When preparing it, place a combination of Ricotta Cheese + Mozzarella Cheese on top of the Eggplant round after placing the Eggplant in the baking dish.  Then, top with a second round of Eggplant.  That extra yummy taste of  creamy Ricotta Cheese sandwiched between Eggplant slices!

Bake a batch!  It's so good!      
  
Cheesy Eggplant Parmesan

Ingredients:
2 Eggplants
Olive Oil for baking & sauteing
Basil
1 Cup Ricotta Cheese-  can be low fat or fat free
8 ounces Shredded Mozzarella Cheese
Tomato Sauce- (16- 20 ounces)
(1) 6 ounce can Tomato Paste
Garlic Powder
Oregano
1 Green Pepper (chopped) and/ or 1 Zucchini Squash (chopped)

Method:
  1. Preheat oven to 450°F. 
  2. Line a large cookie pan with foil, spray with PAM.
  3. Wash & dry all vegetables.
  4. Cut each Eggplant into 1" rounds.  ***Cut an even number of rounded slices. 
  5. Place each Eggplant round on cookie sheet. 
  6. Drizzle a small amount of Olive Oil for baking & sauteing on top of each round.
  7. Then, lightly sprinkle with Basil. 
  8. Bake Eggplant for 20 Minutes in 450°F. 
 After Eggplant has been removed from oven, lower oven temperature to 350°F.

***While Eggplant is baking:
  1.  Spray a large baking dish with PAM.
  2.  Combine & mix Tomato Sauce & Tomato Paste in a bowl.
  3.  Place a small amount of sauce mixture in baking dish, covering bottom of dish.
  4.  In another bowl, combine 1 Cup Ricotta Cheese and about 3 ounces of Mozzarella Cheese.

    After Eggplant comes out of the oven:
  5.  Place half of baked Eggplant rounds in baking dish.
  6.  Place Cheese mixture on top.
  7.  Place an Eggplant round on top of cheese.
  8.  Top with Sauce mixture.
  9.  Sprinkle on Mozzarella Cheese.
  10.  Add chopped Green Pepper and/ or chopped Zucchini to baking dish around Eggplant.
  11.  Cover the vegetables with all the remaining sauce mixture.
  12.  Bake for 30- 35 Minutes until Eggplant is soft.
  13.  Serve with Spaghetti & a Veggie Salad. 
This is a delicious dinner using fresh vegetables!  No longer do I miss ordering Eggplant Parmesan at an Italian restaurant.  :)

Enjoy!
Yummy!
  

Sunday, October 8, 2017

~Early Autumn~

What a great month- October!  Warm days, cool nights!  Oh wait, for the past few days it's been warm days & warm nights.  Well, sometimes things change a bit.  It is October & the local Butternut Squash are now available to purchase.

That brought our recent visit to Meadowbrook Farm in East Longmeadow.  From leaving our yard to arriving at the road side stand, it was autumn.

The fronds on our Porcupine Grasses sway in the breeze.

    
Orange Dahlias, multi colored Zinnias and Grasses in our side garden.


And then, the colorful Mums at Meadowbrook Farm!


Definitely in season- gourds & Pumpkins!


Before we know it, the leaves will be turning.  Autumn is colorful!

Enjoy!