Showing posts with label grilled. Show all posts

Saturday, June 11, 2022

Pork Fried Rice

Pork Fried Rice
ready to be served!

We enjoy eating Pork Fried Rice.  In the past it was a side dish whenever we were in the mood while ordering from our fave Chinese restaurant.  Well, not anymore. It comes together so quickly when you have the ingredients on hand.

Either baked in the oven or grilled, we also enjoy Pork Tenderloin!  There are always a few slices left in the serving dish after dinner.  If there is one thing that I learned at the start of the pandemic it was-  a small amount of any food can be incorporated into another delicious dish on another evening.  This is the case with those extra slices of baked/ grilled Pork Tenderloin.

Rice is another ingredient in this dish, so whenever I make this dish, I start the Rice first.  I always make my whole recipe and later freeze the extra cooled Rice not needed at the time in a labelled/ dated freezer bag.  It's placed in my freezer ready to use in the future.  Click here for Rice Recipe
***Lately, instead of using the chicken broth I have been using only cold water

Pork Fried Rice
Serves 2- 3 people 

Ingredients:
A few slices of Baked/ Grilled Pork Tenderloin
1 and 1/4 Cups Prepared White Rice
2 Whole Eggs
2 teaspoons Olive Oil for sauteing/ baking
3/4 Cup frozen Peas
4- 6 teaspoons Soy Sauce- I use low sodium.

Method:

  1. Prepare Rice.
  2. Cut Baked/ Grilled Pork Tenderloin slices into small pieces, set aside.
  3. Scramble 2 Whole Eggs, set aside.
  4. Add 2 teaspoons Olive Oil for sauteing/ baking to large skillet. Heat.
  5. Remove skillet from heat and place cooked/ prepared Rice in large skillet.
  6. Heat Rice by stirring.
  7. Add frozen Peas and combine.
  8. Add Soy Sauce to skillet and combine all. 
  9. Add Pork Tenderloin pieces and Scrambled Eggs and combine everything.
  10. Heat all thoroughly and serve when Peas are tender.

When you have any extra slices of the Pork Tenderloin after dinner, this is a great meal to prepare for Part II. It is easy and it is also delicious!

Enjoy!
Yummy!

Thursday, May 19, 2022

Grilled Chicken- Part 2

Grilled Chicken- Part 2

To some people the word leftovers is not appreciated much.  However, to me leftovers can be the beginning of another entree to be enjoyed at dinner.  For example, a few days ago grilled chicken tasted great!  I had a box of Kraft Mac & Cheese in the pantry and it paired so well with the chicken.  We enjoyed a vegetable, too.  Needless to say we had leftovers.

That brought another easy to prepare entree 2 nights later.  Two Zucchinis were cut into slices, then cut in half and sauteed.  Mushrooms were also cut into slices and you guessed- sauteed. (***Yes, I did rinse them under/ in cold water/ drained before slicing.)  The chicken was cut into small chunks and added to the large sautee pan along with the Mac & Cheese- to heat everything.  Then, I added about 2 ounces of water and stirred everything together.  Without the water it may have been a bit dry.    A quick trip to my spice rack for the Oregano and Basil.  Two shakes of each went into my sautee pan.  Then, a little more stirring.  Before I knew it we were eating dinner! 

This was one delicious dinner!! Two of the ingredients were leftovers!  Who would know??  

Now, this is a recipe that needs no specific written instructions.  It's a "use what you have", sautee some veggies, add water, Oregano and Basil.  Dinner was so good!!

Try it!
We enjoyed it!
Yummy!


Thursday, April 14, 2022

Grilled Haddock

Grilling the Haddock Fillets
(File Photo)


Last night Grilled Haddock was on our menu!  It is always very easy to prepare and is also a delicious dinner.  The Haddock fillets are coated with Olive Oil, Paprika and Thyme and then placed in a grilling basket on the grill.  Before you know it, it is ready to be served along with a vegetable and a salad.  On a warm evening it comes in handy to remember grilling is an option at dinner time. 

For my complete Instructions, click here.

Enjoy!
Yummy!    


Thursday, July 29, 2021

Grilled Zucchini

Grilled Zucchini

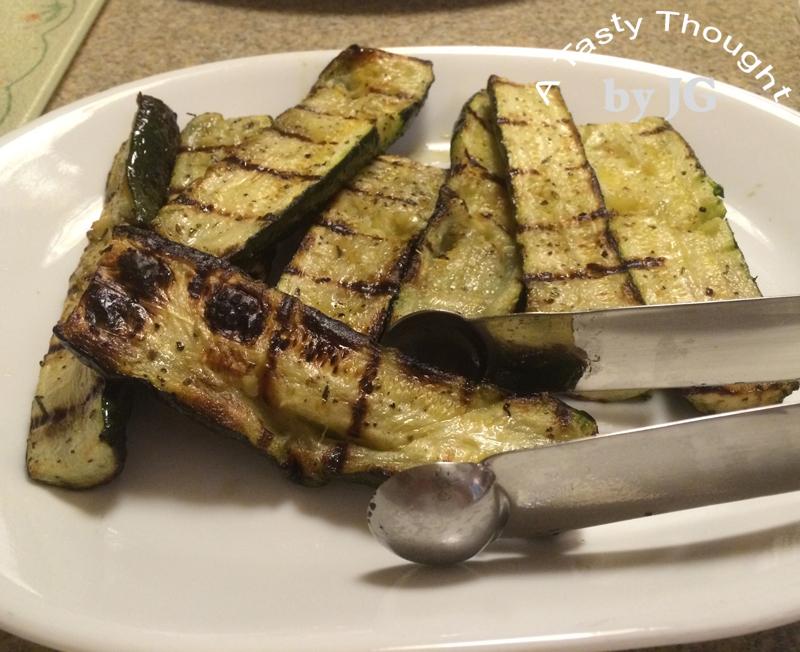
Warm grilled Zucchini halves always taste so delicious!  In the warmer months- like in the summer- this is a great side dish at dinnertime!  It is placed on our grill after being coated with Olive Oil, Basil and Oregano.  Sometimes, I add garlic powder, too.  It is so easy to prepare, grills quickly and tastes so yummy!  Any extra pieces are refrigerated.  The next night they are cut into smaller pieces and added to a veggie salad.   

If you have not enjoyed this very easy delicious side dish, add Zucchini to your grocery list or Farmers' Market list this week and try it.  The recipe is below: 

Recipe for Grilled Zucchini!     

Enjoy!
Yummy!           


Thursday, May 13, 2021

Grilled Swordfish!

Grilled Swordfish
The warm weather has arrived!  Here in Western Massachusetts we have gardening on our minds!  It's time to start purchasing our annuals, perennials and seeds too.  The garden centers were crowded today with so many enthusiastic people choosing the plants that will add color to their yards this Spring, Summer and Autumn.  Some people are also planning their vegetable gardens. 

Today is a beautiful sunny day and our local grocery store has fresh Swordfish in the Seafood Department.  I knew what we would be having for dinner.  Grilled Swordfish!  It's easy to prepare and does not take long to grill.   

The amount of needed grilling time depends on the size of the piece of Swordfish Steak and your grill. Using our grill it usually takes 14- 15 minutes total grilling time.  7 minutes on each side.

For my Grilling Swordfish recipe, click here.  Yes, it is worth the click! 

Now that we have returned to shopping "in person" in our grocery store, Mashed Potatoes and a veggie salad will also be served.  It's amazing how much we missed eating Mashed Potatoes when I was planning our menu for one and one-half weeks at a time.  We also did not have fresh seafood as much as we usually do.  However, a bag of frozen Shrimp was always in our large freezer.  Frozen Shrimp has become a staple for me and purchasing it "on Special" is the best way.  This past year+ has certainly been challenging, but the future looks so bright!

Enjoy!
Yummy!     


Monday, May 11, 2020

~Grilled Haddock~

Grilled Haddock
(File Photo)
One day last week it was pleasantly warm outside.  Earlier that day about 1 pound of Haddock fillets had been purchased from our grocery store.  The day passed way too quickly and before I realized it, I needed to make decisions about dinner!  I knew we would be enjoying this seafood prepared- some way.  Exactly how I wasn't sure.  That was when our grill came in handy!  It was the first time this Spring that we enjoyed Grilled Haddock!  It is so easy to prepare and takes a short amount of time to grill.  A grilling basket/ container comes in very handy here!  A sauce is not needed to add extra flavor.  The Paprika and Thyme work so well here.

For the recipe, click here.

Haddock fillets will be added to our next grocery list.  If the day is pleasant outside, that is probably how I will prepare this seafood, again!

Enjoy!
Yummy!

Friday, May 1, 2020

Chicken Enchiladas

Chicken Enchiladas
These days living our daily lives dealing with COVID- 19, grocery shopping has become a planned activity.  There's no more making a short list and popping in to your favorite grocery store.  It's much easier to purchase ingredients that will be used in meals that we can enjoy for 8- 10 days.  The pound of Haddock that's purchased is prepared and enjoyed that night, like usual.  However, there are no longer 3 items on our grocery list.  It has become a larger list!  So, a slightly larger amount of chicken can be purchased, then grilled or baked.  There are easy meals to prepare and to enjoy with those extra slices of chicken the next night.  I talking Chicken Enchiladas!  Packaged Tortillas and Salsa need to be added to your grocery list if you are planning on enjoying this dinner one night, soon!

It's easy to prepare because the chicken has already been cooked!  The extra slices are cut into small pieces and mixed with sour cream, shredded cheese and a few other ingredients.  A small amount is placed on each tortilla before wrapping and placing into a baking dish.  About 30 minutes later Chicken Enchiladas will be ready for dinner.

Yes, I have written complete directions for this recipe before and it can be found here.

Last night we enjoyed them.  It sure was a quick and easy dinner to prepare!  Add tortillas and salsa to your grocery list whenever you will be baking/ grilling chicken.  A few slices of the chicken is key to another delicious dinner!  Leftovers?  Oh, no!  Those extra slices are the main ingredient to a very delicious dinner.  

Enjoy!
Yummy!


Thursday, October 19, 2017

~Flatbread Pizza~

The last slice of Grilled Pork Tenderloin Flatbread Pizza!
You are planning on Flatbread Pizza for dinner.  Pork Tenderloin was grilled last night & there are a few slices remaining.  A Green Pepper & Zucchini are in the fridge.  Ricotta Cheese & shredded Cheese are quickly found there, too.  Oh wait, the Zucchini is not fit to be used.  Need to toss it!  There is a change of plans!  No, not take out!  A quick glance in the fridge & a ripened Pear is just waiting. 

You guessed it.  This was going on last night.  Plan B was that the Green Pepper & Pear were sliced/ roasted & placed on the Flatbreads.  We enjoyed another variety of Flatbread Pizza! 

While you are roasting the Green Pepper & Pear, get the other ingredients ready.  Before you know it, it will be time to toast the Flatbreads for 2 Minutes in the oven.  Then, the ingredients are placed on top & you will be ready to place them in the oven.

These are so delicious!  They are also quick & easy to prepare.  For 2 servings, I use 3 Flatbreads.  The Ricotta Cheese is always spread on the toasted Flatbreads, first.  Then roasted veggies (fruit) & grilled Pork or Chicken.  Diluted BBQ sauce that's drizzled on top gives it extra flavor.  Then, sprinkle on the shredded Cheese!  Bake for 5 Minutes.
  
***Roasting Veggies:  Rinse Green Pepper & Pear under cold running water, pat dry.  Cut the Pepper into strips.  Then, cut the Pear into strips about 3/4" wide.  After coating with baking & sauteing Olive Oil, Garlic Powder, Basil & Oregano, roast in a 450°F oven for 15 minutes.

Grilled Pork Tenderloin Flatbreads
     For 2 Servings

Ingredients:
Flatbreads- I use 3.
Roasted Green Pepper & Pear strips
1/4 Cup Ricotta Cheese (can be fat free) for each Flatbread
Grilled Pork Tenderloin- cut into chunks
4 teaspoons BBQ Sauce
1 teaspoon water
Shredded Cheese- desired amount

Method:
  1. Place (3) Flatbreads in a large cookie pan & bake in a 375°F Oven for 2 Minutes. Remove from oven. 
  2. Spread about 1/4 Cup Ricotta Cheese on each.  (I use Fat Free.)
  3. Place roasted Green Pepper & Pear strips on Flatbreads.
  4. Add Grilled Pork Tenderloin that's cut into chunks.
  5. In a small cup combine 1 teaspoon water with 4 teaspoons BBQ Sauce.
  6. Drizzle BBQ Sauce mixture over Flatbreads. 
  7. Sprinkle desired amount of Shredded Cheese on top.
  8. Bake for 5 Minutes at 375°F.
  9. Remove from oven.
  10. Cut each Flatbread Pizza on a diagonal, into 3 pieces.
  11. Cover & refrigerate any leftovers. 
Last night one slice remained after dinner.  It was also the slice that contained the least amount of ingredients.  No problem.  It was part of my husband's lunch today.

Enjoy!
Yummy!
              

Friday, August 25, 2017

Grilled Chicken Flatbread with Roasted Veggies

Grilled Chicken Flatbread
with Roasted Green Pepper & Zucchini
Sometimes, do you have a few slices of Grilled Chicken remaining after dinner?  Do you have a Green Pepper & a small Zucchini just waiting in the fridge?  If the answer is Yes, Flatbread Pizza might be in your future!  This summer whenever we have leftover Grilled Chicken I know we'll be having this for dinner in the next 2 days!  

In April I shared how yummy BBQ Pork Tenderloin Flatbreads with Roasted Asparagus are.  Roasted Asparagus & fresh Spinach were placed on top along with chunks of BBQed Pork Tenderloin.  What a quick, easy & yummy dinner!

The packages of Flatbread that I use have baking directions on the package.  I make 3 White Flatbreads.

***Roasting Veggies:  Rinse veggies under cold running water, pat dry & cut into slices or chunks.  After coating with baking & sauteing Olive Oil, Garlic Powder, Basil & Oregano, they are roasted in a 450°F oven for 15 minutes. 

Then it's time to start making the Flatbreads!

Ready for the oven!

Grilled Chicken Flatbreads
with Roasted Veggies

Ingredients: 
Flatbreads
***Roasted Green Pepper strips & Roasted Zucchini slices.
1/4 Cup Ricotta Cheese (can be Fat Free) for each Flatbread
Grilled Chicken cut into chunks
1 teaspoon Water
4 teaspoons BBQ Sauce
Shredded Cheese- desired amount to be sprinkled on top

Method:
  1. Place (3) Flatbreads in a large cookie pan & bake in a 375°F Oven for 2 Minutes. Remove from oven.
  2. Spread about 1/4 Cup Ricotta Cheese on each.  (I use Fat Free.)
  3. Place Roasted Green Pepper strips & Roasted Zucchini slices on each Flatbread. 
  4. Add Grilled Chicken, that's cut in chunks.
  5. In a small cup combine 1 teaspoon cold water & 4 teaspoons BBQ Sauce.  Mix well.
  6. Drizzle BBQ sauce mixture over the 3 Flatbreads.
  7. Sprinkle desired amount of Shredded Cheese on top.
  8. Bake for 5 Minutes at 375°F.
  9. Remove from cookie pan & cut each Flatbread into 3- 4 pieces.
Any extra slices are refrigerated for the next day's lunch!

These are so good & not full of dough!  Just topped with chunks of Grilled Chicken & Roasted Veggies!  With all of the local fresh produce at our roadside stands, fresh veggies are now in season!  

Enjoy!
Yummy!

Thursday, July 13, 2017

Tomato & Grilled Zucchini Salad

Tomato & Grilled Zucchini Salad

When preparing dinner I usually take out my iPad, place it on my kitchen counter & cook- using recipes on my blog or others I've saved.  There are countless yummy foods that I've posted that we like.  The ingredients are usually on hand, too.          

Now, it's the time of year to BBQ!  Zucchini is a veggie that we like sauteed, but during the warmer months it finds a place on our grill whenever we're grilling dinner.  Oregano, Basil & Garlic Powder added to the Baking & Sauteing Olive Oil give that veggie great flavoring!  Usually 3 or 4 Zucchini are prepared.  They are so good! 

One of the Grilled Zucchini are not eaten at dinner.  It's saved for Tomato & Grilled Zucchini Salad the next day!  This cold salad is just yummy with a little Balsamic Vinaigrette drizzled on top!

Tomato & Grilled Zucchini Salad

Ingredients:
1- 2 Grilled Zucchini, cold (Directions for grilling) 
1 Large Tomato- cut into chunks
Feta Cheese
Balsamic Vinaigrette

Directions: 
  1. Cut Grilled Zucchini into slices.
  2. Cut Tomato into chunks.
  3. Place into serving dishes.
  4. Sprinkle on Feta Cheese.
  5. Drizzle Balsamic Vinaigrette on top.
It's a delicious cold salad!

Enjoy!
Yummy!
        

Friday, July 15, 2016

Chicken Salad Platter

Chicken Salad Platter
Chunks of Grilled Chicken, juicy Nectarines & creamy Avocado resting on a bed of shredded lettuce!  Add a few whole Pecans, some shredded Red Cabbage & Carrots with Feta Cheese resting on top.  Now that is colorful!  Now that is so nutritious & yummy, too!

Then Raspberry Balsamic Vinaigrette drizzled on top.  This is definitely my kind of Salad Platter for dinner.  It's been HHH lately, so after enjoying Grilled Chicken, Grilled Zucchini & a microwaved "Baked Potato" one night at dinner, a cold Chicken Salad Platter the next evening is oh so good!

The OXO salad dressing shaker is filled with:

Raspberry Balsamic Vinaigrette
  • 1/4 Cup Balsamic Vinegar
  • 1/2 Cup Olive Oil for salads
  • 2 teaspoons Raspberry Jam or Jelly
Then, shake, shake, shake & shake that container again!
Repeat & repeat again until the Jam/ Jelly is dissolved.

If I had cold Grilled Zucchini left, I'd add it to the Salad platter, too! This is a great refreshing nutritious dinner on an HHH night!

Yummy!
Enjoy!

Monday, December 7, 2015

Festive Chicken Salad Platter

Festive Chicken Salad Platter
Cold Salad Platters are the best!  They taste especially good when it's the beginning of December in New England & you've enjoyed grilled Chicken the day before.  December could bring any surprising weather for us, but Saturday brought temps in the low 50°'s F & we enjoyed grilled chicken for dinner.  There were a few slices remaining- Yum!

At this time of year when the produce purchased in grocery stores is not as fresh or tasty as our local summer produce, a ripened Pear tastes so good!  One was in our fridge!     

It was perfect timing for a cold salad platter the next day!  It was just e-a-s-y!  Salad Greens served with chunks of grilled Chicken & also fresh Pear chunks.  A few unseasoned cooked Green Beans were added in.  Colorful Craisins,  yummy Pecans & a little Feta Cheese was sprinkled on top.  Balsamic Vinaigrette drizzled over it.  This dressing has become our fave. 

What a yummy dinner salad!  It was made from "leftovers" & staples in my pantry & fridge!    
  
We may be enjoying these two entrees again this month.  If it's comfy outdoors to grill during the dinner hour, we surely will.

Balsamic Vinaigrette  

Ingredients:
1/2 Cup Olive Oil for salads & marinades
1/4 Cup Balsamic Vinegar
Dash Black Pepper

Optional:  1 Tablespoon Raspberry Jam or Jelly

***Salad Dressing Mixing/ Shaking Container

Method:  
  1.   Place Olive Oil & Balsamic Vinegar in shaker container.
  2.   Add dash of Black Pepper.
  3.   Optional:  Add 1 Tablespoon Raspberry Jam or Jelly.
  4.   Place cover on container.
  5.   Shake, shake, shake & shake again. 
  6.   Drizzle over salad.
  7.   Enjoy!
Note:  If adding optional Jam or Jelly, shake container until Jam or Jelly is dissolved.

I store my Balsamic Vinaigrette in my fridge.  About 1/2 hour before using again, I place on my counter,  so it comes to room temperature.  Shake, shake, shake until blended together & enjoy again. 

Enjoy!
Yummy!
   

Wednesday, May 27, 2015

Grilled Zucchini

Grilled Zucchini
Warm weather & grilling time!  Woohoo!  I've been waiting for this- wearing short sleeved shirts, shorts & sandals.  And there's that added perk of prepping dinner to cook outdoors.  The teasing aroma from the grill each time that its lid is opened while food is cooking signals warm weather.  Grilled seafood, chicken & beef have been enjoyed this past week.  

On Saturday I "spied" Zucchini in the produce dept. of our grocery store.  Four smaller sized firm veggies were chosen.  It didn't take long to decide Grilled Zucchini would be the veggie that evening for dinner.  Yum!  Grilling Zucchini is easy & it tastes soo goood!

Basil, Oregano & Garlic Powder from my Spice Rack were combined along with Olive Oil for sauteing & baking to coat the Zucchini halves.  Then, they were grilled.

An extra Zucchini was grilled, too- it makes a great addition to a cold veggie dinner salad!  Cut in small chunks & add in.  Yum!

Grilled Zucchini

3- 4 small Zucchini
3- 4 Tablespoons Olive Oil for sauteing & baking
1/8 teaspoon Basil
1/8 teaspoon Oregano
less than 1/8 teaspoon Garlic Powder

Method:
  1. Combine Olive Oil, Basil, Oregano & Garlic Powder in baking dish or plastic bag.
  2. Rinse Zucchini under cool running water & dry.
  3. Cut 1/2" off each end (blossom end & stem).
  4. Then, cut each Zucchini in half- blossom end to stem end.
  5. Place each 1/2 Zucchini in Olive Oil combination.
  6. Coat each side of vegetable.
  7. Using tongs, place on heated grill, cut side down.
  8. Turn over to cook other side.
  9. Grill until soft- as desired.
  10. Grilling Time depends on heat of grill & distance from heat.  On our grill Zucchini is grilled in 15-17 minutes.
Any remaining slices can be refrigerated & added to a cold salad.

Enjoy!
Yummy!


Monday, August 18, 2014

"Peruvian Grilled Chicken"

"Peruvian Grilled Chicken"
Was it the Cumin?  The Paprika? Or the Lime Juice that smelled so good when the cover to our outdoor grill was opened?  This combo along with Garlic & Oregano resulted in a wonderful aroma floating through our Family Room screen!  I knew I was hungry, but suddenly I was famished!  Then, my DH turned the chicken that was grilling over to grill the other side.  We totally loved the flavor while enjoying dinner that evening.  No need to purchase any bottled marinade for this recipe.  You have the marinade ingredients in your fridge & pantry!

Two weekends ago we had a "Family Get-Together".  So FuN & a family tradition!  This entree was definitely on our menu- very tasty, very tender slices of marinaded chicken.  Oh, it's outdoor grilling time!

This recipe, "Peruvian Grilled Chicken", was one that I had literally ripped out of our local Springfield Republican back in 2007. The recipe had been reprinted from the Sept. 2007 issue of Gourmet Magazine.  So glad I saved it!

The chicken breasts are marinated 4- 8 hours or overnight in a great combo of ingredients!  A gallon sized Ziploc Freezer bag works so well, here.  If you enjoy the taste of tangy Lime Juice, Cumin & Paprika, you'll definitely like this marinated grilled chicken.  Try it, you'll like it!

"Peruvian Grilled Chicken"
     adapted from Gourmet Magazine  
            via Springfield Republican

Ingredients:
3 Boneless Skinless Chicken Breast halves

*****
Marinade:
 In a Gallon sized Ziploc Freezer bag combine & mix the following:

1 teaspoon Garlic Powder
2 teaspoons Cumin
1 teaspoon Paprika
1/2 teaspoon Oregano
1/2 teaspoon Black Pepper - or less according to taste
1 Tablespoon Olive Oil for sauteing & baking
1/3 Cup Lite Soy Sauce
3 Tablespoons Lime Juice

Method:
  1. Prepare marinade by combining ingredients in Gallon sized Ziploc Freezer Bag.
  2. Add 3 boneless skinless Chicken Breast halves to Ziploc Gallon sized Freezer bag. (I still rinse the chicken under cool running water & then carefully clean my work surface later.)
  3. Place closed Ziploc Bag in/ on a dish & refrigerate for 4 - 8 hours, or overnight.
  4. Turn once.
  5. Heat grill.
  6. Remove Chicken from bag to drain.  Do not save marinade. 
  7. Grill Chicken.  Our grill requires 12 Minutes each side of chicken.  Grilling time depends on size/ thickness of Chicken & your grill.
  8. After grilling, place on clean platter.  Let stand 5 minutes before cutting into slices.
I like to grill 3 chicken Breasts & use the leftover slices in a cold salad platter for dinner the next evening.
Cold Salad Platter
This is a "try it, you'll like it" recipe.  For our "Family Get-Together", I prepared a triple batch - each marinading separately.  There were no extra slices for any cold Salad Platters the next evening!  The Lime Juice gives it an extra kick!

Enjoy!
Yummy!

Thursday, July 10, 2014

Grilled Haddock Dinner

Grilled Haddock Dinner!
The sun is shining and we are surely making up for the chilly damp days of spring.  This AM I was unsure what we would have for dinner.  When I asked my DH, he reminded me of a blog - A Tasty Thought by JG.  It is summer and suddenly I remembered my top blog post of ALL time.  So, it was definitely a day to purchase the fresh "wild caught" Haddock in our local grocery store and find my grill basket, because it's outdoor grilling time tonight!  This recipe is very easy & yes, previously frozen "wild caught" Haddock also tastes great!

Grilled Haddock

Ingredients:
Haddock Fillet(s)
Olive Oil
Paprika
Thyme


****
Grilling Basket/ Container
PAM

Method
  1. On a large dish pour about 2 Tablespoons Olive Oil.
  2. Sprinkle a little Paprika & Thyme on top. 
  3. Rinse Haddock Fillets under cold running water and place on top of Olive Oil & Spices.
  4. Turn Fillet(s) over to coat other side.
  5. Place Haddock Fillets in grilling container/basket that has been sprayed with PAM.
  6. Grill Fillets on preheated grill.
  7. **A 1 lb. piece requires 5 - 8 minutes on each side, depending on thickness of Fillet.
  8. Turn Fillets over one time to grill during grilling process.
  9. Enjoy!  
**Grill the Fillets slowly using a Low to Medium heat setting to retain the moisture.

Summer, the outdoor grill, an easy meal to prepare - what can be better?  The 2 side dishes will be posted other days.  They were so tasty served along with the Grilled Haddock!

Enjoy!
Yummy!

Saturday, April 26, 2014

~Grilled Swordfish~

Daffodils facing the sun!
The bright yellow Daffodils are blossoming in our front cut-out!  Golden forsythias stand out in our backyard.  It's Spring and yesterday it felt mighty fine to be outdoors without a jacket!  Yes, I did write without a jacket!  Another quick look into our backyard and our grill is spotted.  It's been a tease during the harsh winter months just sitting on the side of our deck - covered - waiting to be used.   

Yesterday, the lid of the shiny grill was opened and a Swordfish Steak was placed on the grill.  Swordfish has been a fave of mine way back from my childhood.  The only way my mom prepared it was using the broiler.  However, I've learned that Grilled Swordfish is absolutely delicious!  And it requires little clean-up after dinner.

I've posted my method for grilling Swordfish in the past.  After totally enjoying this grilled fish along with a veggie salad & a microwaved "baked" potato, I decided to share it once again.  So good! 

Grilled Swordfish
(File Photo)
Grilled Swordfish

Ingredients:
1 lb. Swordfish Steak
Olive Oil
Paprika - about 2 shakes from the bottle

Method:
  1.  Preheat outdoor grill.
  2.  Pour about 2 Tablespoons Olive Oil on a large dish.
  3.  Sprinkle a little Paprika on top of Olive Oil.
  4.  Rinse Swordfish Steak under cold running water.
  5.  Place on Olive Oil/Paprika in dish.
  6.  Turn Swordfish over to coat other side.
  7.  Place on heated grill and put grill cover down.
  8.  Grill for 7 minutes and 30 seconds.  
  9.  The fish is turned over & grill other side for 7 minutes and 30 seconds.
 *** The amount of needed grilling time depends on the size of the piece of Swordfish Steak and the grill.  Using our gas grill turned up 3/4 heat a 1 lb. piece requires 7 minutes and 30 seconds on each side.  The cover is down while grilling.

Do you enjoy grilled seafood?

Enjoy!
Yummy!

Friday, March 21, 2014

Cole Slaw with Raisins

 
Cole Slaw with Raisins
Cabbage!  Carrots!  Raisins!  Each is tasty & nutritious by itself.  Put them together, add a few other ingredients & an easy salad can be enjoyed at dinner!  Cole Slaw with Raisins is so yummy!

Many years ago, my mother-in-law gave me her delicious, tangy Cole Slaw dressing recipe.  In the past I've purchased the cabbage & the carrots to peel/ shred, but these days a bag of these ready shredded veggies makes this side dish very easy to prep.

If you're waiting for the warmer days when the local salad ingredients will be available at roadside stands to be purchased, but still enjoy fresh salads, make this Cole Slaw.  It's great!  Add the raisins for that extra sweetness.

This dressing also tastes great in Carrot Salad.

Cole Slaw with Raisins

Ingredients:
1  bag shredded Cabbage & Carrots (16 ounce)
1/2 Cup Raisins
*  *  *  *
Dressing Ingredients:
6 Tablespoons Mayonnaise
2 Tablespoons Sugar
1/2 Cup Milk (I use Soy Milk.)
1/2 Cup Vinegar (I use Cider Vinegar.)

Method:
  1. In a large bowl combine Mayonnaise and Sugar.
  2. Add Milk & Vinegar and stir well.
  3. Add shredded Cabbage & Carrots to mixture, stir.
  4. Add Raisins.
  5. Stir well, cover & refrigerate.
  6. After 2- 3 hours, stir again & refrigerate.
  7. Repeat again in 2- 3 hours.
  8. Before serving, stir again.
This is a delicious easy to prepare side dish when serving seafood or any entree that has been prepared on the outdoor grill!

Spring is here!!!  Woohoo!!!

Enjoy!
Yummy!
  

Friday, February 21, 2014

~Dreaming~

Dreaming!


Snow blowers, snow shovels, snow plows & snow rakes!  They are the words of the month.  Sleet, rain and distant thunder (today) have been added to the mix.  However, whenever I look outside at our snow covered grill, one thought comes to mind while day dreaming.  Grilled Sockeye Salmon!  Much snow has melted in the last day, but grilling is still only a dream!

When the weather get warmer we will Enjoy!
Yummy!

Friday, November 15, 2013

Simple Soup & Sandwich

Tomato Basil White Bean Soup & Grilled Cheese n Tuna Sandwich
This week we had a couple of days that were cold.  They were dreary, too.  They also contained the sound of "achoo" from me.  Wednesday evening an easy meal to prep at dinner was needed.  Hot soup with a Grilled Cheese Sandwich sounded really good!  Plain, simple, good! 

All of the ingredients for Tomato Basil White Bean Soup (recipe here) were found quickly.  As some of the ingredients including canned plum tomatoes cut in pieces, chicken broth, tomato sauce, Basil & Garlic Powder were simmering, my griddle pan was located.

Grilled Cheese on oatmeal bread is a fave here & sometimes I add tuna when making it - before grilling.  For a number of years, tuna packed in olive oil is our preferred choice.  Some of the oil is drained from the can, before mashing the tuna.  I skip adding the mayo here and just add the tuna into a sandwich.  Quite often when turning a Grilled Cheese n Tuna Sandwich over while grilling, a little tuna sneaks out onto my griddle.  No longer will that happen!

The magic?  Add a little shredded cheese into the mashed tuna before placing it on the bread slice.  The shredded cheese heats, melts and keeps the tuna together.  It's also a little extra cheese in the Grilled Cheese n Tuna Sandwich.  What a great taste!

It was so good along with the Tomato Basil White Bean Soup!  It was also very easy!

We did enjoy!
Yummy!
       

Wednesday, April 17, 2013

Sockeye Salmon - on the Grill

Sockeye Salmon on the grill.
A sunny day in Massachusetts! Temperatures in the low 70°'s.  The vibrant yellow forsythias & daffodils are blossoming!  Tulip buds are now visible!  Spring!  Tonight was definitely a great evening to grill "wild caught" Sockeye Salmon for dinner.

Originally, this was not in my dinner plans for tonight.  However, who can resist grilling seafood on a beautiful spring evening?  A 1 lb. fillet of "wild caught" Sockeye Salmon (previously frozen) was purchased at our local Big Y's seafood department and the grilling basket was located.

This is an easy, quick dinner that tastes so good! 

Grilled Sockeye Salmon

Ingredients:
Salmon Fillet
Olive Oil for sauteing & baking
Paprika

***A grilling basket/ container  is a very handy tool to use.  It is sprayed with PAM before placing on the heated grill.

Method:
  1. Heat grill.
  2. On a large dish pour about 2 Tablespoons Olive Oil for sauteing & baking.
  3. Sprinkle about 1/8 teaspoon Paprika on the Olive Oil.
  4. Rinse Salmon Fillet under running cold water.
  5. Place fillet on Olive Oil/Paprika skin side up.
  6. Turn fillet over and coat other side with Oil mixture.
  7. Place fillet on/in grilling basket/container that has been sprayed with PAM.
  8. Grill on one side and then grill other side. 
  9. Grilling time - A 1 lb. piece requires 5 - 7 Minutes on each side.
***The amount of needed grilling time depends on the size of the piece of Salmon Fillet and also on the Grill.

Serve with a microwaved "Baked Potato" and a veggie salad!

Enjoy!
Yummy!