Showing posts with label easy. Show all posts

Friday, November 15, 2024

Cheesy Broccoli Tortellini

Cheesy Broccoli Tortellini

Sometimes you just need a VERY quick and easy dinner! Sure, you can order "take- out" or take a previously prepared dinner out of your freezer to reheat in your microwave. Another option is to prepare Broccoli Tortellini or Broccoli Tortelloni. For that reason I always try to keep a package of fresh cheese filled tortellini in our fridge. In our freezer a package of frozen broccoli florets can be found quickly. Shredded cheese is in the fridge, too. These are the main 3 ingredients to prepare this dinner.

The directions are very easy.

Cheesy Broccoli Tortellini 

Ingredients:

1 pkg. Cheese filled Tortellini ( can be Tortelloni)
1 pkg. frozen Broccoli florets
1 Tablespoon Olive Oil-  for frying/ cooking
Dried Basil- to sprinkle on top
1/4 Cup Shredded Cheese

1- 2 extra teaspoon(s) Olive Oil- if needed when stirring ingredients together  

Directions:

  1. Prepare Cheese filled Tortellini according to package directions.
  2. Microwave Broccoli following package directions.
  3. After microwaved, cut Broccoli into bite sized pieces.
  4. Heat 1 Tablespoon Olive Oil in a large frying pan that has a cover.
  5. Add the cut Broccoli to the pan.
  6. Sprinkle dried Basil on top- maybe 1/4 teaspoon 
  7. Drain cooked Tortellini and add to pan.
  8. Carefully stir all ingredients to combine.
  9. Add additional Olive Oil if dry.
  10. Combine all and heat.
  11. Turn off heat and add 1/4 cup Shredded Cheese on top.
  12. Cover the pan so cheese melts.
  13. The melted cheese gives this dinner a great taste.

It is quick. It is easy. It tastes so good!
Will you be preparing this soon?

Enjoy!
Yummy!


Friday, September 1, 2023

Freezing Green Pepper Strips

Green Peppers ready to prepare!
(File Photo)

These past two weeks I've been freezing Green Pepper strips.  The local Green Peppers are still available at roadside stands and also at Farmers' Markets.  In the colder months I defrost a package whenever needed and use them in many entrees.  They are very easy to freeze!    

Sauteed Green Pepper strips are a great addition to a Meatball Grinder!  Quite often a batch of my Meatballs are found in our freezer.  After preparing them I divide them into portion sizes to freeze.  Whenever we have a craving for Meatball Grinders it is easy to defrost the Meatballs for a quick dinner.  It is also very easy to take out a package of frozen Green Pepper strips to defrost/ saute and add to the tomato sauce that I will be using.  You may ask," What about the grinder rolls??"  Oh, I freeze grinder rolls, too.  Defrost them when needed!  It is one of the meals that we enjoy when I never snap a photo, because we are hungry and the aroma of the Meatball Grinders invites us to begin eating. 

Green Pepper strips also work well on homemade Pizza and in Chili!  Plan on purchasing a few Green Peppers this weekend to cut into strips and freeze.

Click here for my method for Freezing Green Peppers!

This winter just reach into your freezer to take out a portion size to use.  You will not need to purchase a Green Pepper in the grocery store either in the produce section or in the frozen food aisle.

Enjoy!
Yummy!


Friday, August 26, 2022

Freezing Green Peppers: Strips + Chunks

Green Pepper Strips
ready for the freezer!
(File Photo)

It's time!! Time to freeze Green Pepper strips and chunks! For quite a few years it's been a tradition with me to purchase the fresh local Green Peppers and prep them for the freezer.  No, I don't freeze the whole Pepper, I cut each Pepper into strips or chunks- discarding the pulp and seeds.  Then, the strips/ chunks are packaged into sandwich bags.  The closed sandwich bags are placed into freezer bags, labeled and into the freezer they go.  In the colder months it's great to reach into my freezer and take out a sandwich bag of prepared Green Peppers to add to an entree while preparing it.  

One day (a few years ago) I noticed that packaged frozen cut Green Peppers were located in the freezer department of a local grocery store.  In the summer this vegetable is plentiful at the local farm stands in my area.  So, the following summer I decided to freeze my own to use!  I learned it worked very well and it was not difficult to do.  

Purchase some fresh Green Peppers and prep them for your freezer.  Prepping a few at a time works well! 

Click here for my post with the complete directions!  

In the colder months you will be able to reach into your freezer and take out a small bag rather than purchasing a Green Pepper in the grocery store.

Enjoy!
Yummy!


Saturday, July 23, 2022

Simply Delicious

Lime flavored Simply Delicious!
(File Photo)

For so many years I have been making this very easy dessert! Especially during the summer. Especially when it is
HHH outside. Especially during a heat wave!!! Simply Delicious is a light dessert that tastes so good.  It is so easy and hits the spot on a hot day.

There are only 3 ingredients in Simply Delicious.  Water, vanilla ice cream and a 3 ounce package of flavored gelatin. I use the JELL-O brand. 

Using the whisk!
Strawberry flavored
(File Photo)

The Directions are simple!

Simply Delicious
   
2 servings

Ingredients:
 

(1) Cup Boiling Water
(1) 3 ounce package JELL-O
(1) Cup Vanilla Ice Cream

Method:

  1. In a large bowl completely dissolve flavored gelatin in 1 Cup boiling water.
  2. Add in 1 Cup vanilla ice cream and stir.
  3. Using a whisk continue dissolving ice cream. 
  4. Pour into 2 dessert dishes or mugs.
  5. Refrigerate for several hours.
  6. Top with whipped cream when serving.  

Now, how easy can that be?  Strawberry, orange and lime flavors are our favorites! Add the ingredients to your grocery list and make this easy dessert!

Enjoy!
Yummy!


Sunday, May 22, 2022

Solar Green Tea

Solar Green Tea

It's another solar Green Tea kind of day here in New England! By the pitcher- 2 tea bags in a pitcher of cold water for about 2-3 hours.  Or by the glass- 1 tea bag in a glass of cold water.  Either way the container sits on my window sill in the sunlight. I use decaf.

Enjoy!
Yummy!


Saturday, March 12, 2022

Best Irish Soda Bread


Irish Soda Bread
(File Photo)


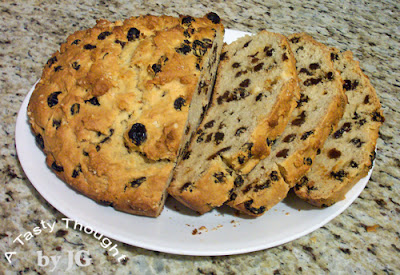
Add unsalted Butter, Buttermilk and Raisins to your grocery list this weekend! It's time to get ready to bake a delicious Irish Soda Bread!  Yes, they can be purchased, but this Irish Soda Bread is filled and I did write filled with moisty Raisins.  Every bite is just so yummy!  This is by far the best Irish Soda Bread that I have ever tasted!  I had used other recipes in the past, but they always were d- r- y.  And, they did not contain enough Raisins.  

Quite a few years ago I "googled" to find what recipe I could come up with.  I did not expect to find much, because I only had 1 Cup of Buttermilk to use.  To my surprise I found a blog with an Irish Soda Bread recipe that required that 1 Cup of Buttermilk.  It was so very easy to prepare.  It had so many Raisins, too!  I was hooked.  I baked it and boy was it delicious!  This recipe is just the best!  I have never searched for another!

Click on this link for the recipe with all of my hints!  The complete story, too!  You will be very happy you did!  I have learned that slices of this Irish Soda Bread freeze very well!  This delicious bread is also a wonderful treat to bake, cool and mail to our sons- for St. Patrick's Day or other special occasions.  You guessed it!  It is a family favorite!  Did I mention that it is easy to prepare??  It is!! 

Irish Soda Bread
cut and packaged to mail
(File Photo)

Yesterday, the Buttermilk was purchased for my St. Patrick's Day Irish Soda Bread baking.  Slices will be on our breakfast table on March 17th!  Heated in the microwave for a few seconds- ah, YUM!!  Bake one this year!

Enjoy!
Yummy!    


Happy St. Patrick's Day!!!

Friday, June 19, 2020

Tortellini Salad

Tortellini Salad
(File Photo)
Like so many of you, my friends, I've been cooking up a storm!  As you can see, I have not had a chance to blog lately.  So, taking a current photo of food is... well... a dream.  I had a little bit of Baking Powder left and this week like magic, I have it.  What a different "new norm"!  I realize you have been finding the same situations at any time during the week.  People are cooking and/ or learning to cook! 

Hopefully, if we all wear our masks and use precautions things will change again to a more comfortable norm. 

One day last week we enjoyed Tortellini Salad as a side dish at dinner.  There was a bag of frozen tri-colored tortellini waiting in the freezer.  Waiting for me to prepare it!  It's one of my favorite pasta salads in the warmer months.  There is something great about biting into a cheese filled Tortellini that's surrounded by Italian Dressing.  The seasonings from the dressing just coat each little Tortellini!  Did I mention it is easy to prepare?  It is!  Very easy!

Sometimes, I add black olives, whole or sliced to this pasta salad.  They are optional.    

Tortellini Salad  

Ingredients:   
(1) 12 ounce bag Frozen Cheese Tortellini- may be lesser quantity
Italian Salad Dressing
Parsley Flakes
Garlic Powder

Method:
  1. Prepare Tortellini following directions on bag. 
  2. Drain, rinse with cold water.  Drain again.
  3. Place in bowl.
  4. Add about 1/2 Cup Italian Salad Dressing, combine.
  5. Add desired amount of Parsley Flakes and Garlic Powder.
  6. Cover and refrigerate overnight or for at least 6 hours.
  7. Before serving, stir.  Add a little more Italian Dressing if needed.
It is that easy!  If you don't have the tortellini in your freezer, remember this recipe to prepare another time in the coming months!

Enjoy!
Yummy!

    Monday, December 30, 2019

    Baked Seafood Casserole

    Baked Seafood Casserole
    (File Photo)
    New Year's Eve is now in my thoughts!  Soon it will be 2020!  It also had me thinking- what will we be enjoying for dinner that night???  I've been paying attention to what you, my friends, have been reading on my foodie blog, lately.  I now have the answer!  Baked Seafood Casserole!  The delicious seafood dinner that is baked in individual casserole dishes.  That seafood dinner that is oh so easy to prepare and tastes so good!

    Ready to enjoy!
    (File Photo)
    Just imagine- holding your fork and digging into the bubbling topping!  Reaching in for a small piece of seafood.  Maybe part of the baked Haddock.  Or maybe a baked Shrimp!  Or just maybe part of a baked Scallop!  It is definitely a great entree for a special evening.  If you have company and they enjoy seafood, they will certainly enjoy this.

    It's a dinner that I bake during the colder months of the year, because it requires 45 minutes in the oven.  While it's baking I work on the Rice side dish and also a salad.

    Click here for my recipe!  Place the ingredients on your grocery list!  Baked Seafood Casserole is delicious! 

    Enjoy!
    Yummy!
            

    Saturday, October 12, 2019

    Apple Crisp- with Raisins and Craisins

    Apple Crisp- with Raisins and Craisins
    (File Photo)
    One just might believe that I forgot what our fave family dessert is in autumn!  That was not totally true!  I had been waiting for the McIntosh and Cortland apples to be available to purchase.  Then, suddenly, they were.  Naturally I purchased both varieties.  Then, for 2 weeks they sat in our fridge.  Waiting.  Every time I saw them it was a reminder. 

    On Friday I finally baked Apple Crisp- with Raisins and Craisins, of course.  It's the dessert that tastes sooo goood with a scoop of vanilla ice cream on top.  It's also the dessert that has a great topping of oats and brown sugar.   Apple Crisp is just so so- without the addition of Raisins and Craisins (dried cranberries).

    This is delicious!  Bake this treat after purchasing some McIntosh or Cortland apples.  If only one of the varieties is available- use it.  During the winter months I find in my area that Empire apples are available, so at that time of year I use the Empire apples.

    Click here for my recipe!

    Now that I've baked it, I'm sure that in about 2 weeks there will be plans for another.  It is a great dessert! 

    Enjoy!
    Yummy!
          

    Sunday, September 23, 2018

    Freezing Green Pepper Strips


    Last September when fresh local Green Peppers were available to purchase at roadside stands or in the grocery stores, I did not purchase any to freeze.  Every year I do, but it just never happened.  Oh, did I ever miss them this past winter whenever a recipe called for chopped Green Pepper!  I always like to freeze the pepper strips and use them in entrees whenever that veggie is an ingredient in a recipe.  No, I don't like to purchase that veggie in the cold winter months.  They just never look that good in the grocery stores.  Because I did not have them, it seemed that I needed them!  Well, this past week I took some action!  The first 5 Green Peppers were purchased/ prepped and found their way into our freezer.  Three days later 5 more were purchased and 5 more little bags of pepper strips were prepped and frozen.    

    It's quite a simple process.  After cutting the Peppers into strips, the strips are placed in sandwich bags and then in a large freezer bag.  Whenever one package is needed, it is at my fingertips.

    * * * For me 1 fresh Green Pepper = 1 little sandwich bag of ready to use Green Pepper strips.

      
    Freezing Green Pepper Strips
    1.  The Green Peppers are rinsed under cool running water.
    2.  Then, dried.
    3.  Using a cutting board, the tops are cut off and discarded.
    4.  Then, cut the Green Peppers into large pieces.  Discard seeds and inner pulp.
    5.  Cut the large pieces into strips.
    6.  Place Pepper strips into sandwich bags and close.
    7.  The filled/ closed bags are placed in a Gallon sized freezer bag, labelled and sealed.
    8.  Store in the freezer. 
    Reaching into my freezer and taking out a bag of Green Pepper strips to use will be a great find this coming winter!  Ten bags should be enough.  This is definitely the time of year to purchase the fresh local Peppers to freeze.  If you have the opportunity to do this, it is worth the small effort!

    Enjoy!
    Yummy!


      Tuesday, March 6, 2018

      ~March 6, 1930~

      My Freezer Door
      (File Photo)
      It was on March 6, 1930!  The location was Springfield, MA!  That was the day that Clarence Birdseye test marketed his new product- frozen food!  That was way before my time, but Springfield is just north of my town.  What an interesting story of Massachusetts history!   

      This inventor was born in 1886 in Brooklyn, NY & attended Amherst College in Amherst, MA for a period of time. Later, when Clarence lived in Labrador with his young family it was challenging to feed his family.  It was during this time that he watched the Eskimos "quick freeze" their food.  His interest in "quick freezing" grew.  Now, his name Birdseye is so familiar to us.  We see it on packages of frozen foods in the grocery stores.

      For the complete story from MassMoments click here.  I always enjoy reading Massachusetts history!!!  

      Thank you Mr. Birdseye!!!
      We enjoy your idea!!!


      Saturday, November 25, 2017

      ~Turkey a la King~

      Turkey a la King
      (File Photo)
      Is there leftover Turkey from your delicious dinner on Thursday?  Or maybe just a little is remaining.  It's a great opportunity to make Turkey a la King for dinner!  You probably have all of the ingredients already.  This is so similar to a Turkey Pot Pie.  However, there is no need to roll out or purchase a pie crust.  A creamy sauce filled with small bites of turkey along with mixed vegetables served over toasted bread.  Now, that's what I call easy.  That's also what I call yummy!

      So, find your can of Chicken Broth, Milk and package of frozen vegetables to prepare this for tonight's dinner.  :)

      Turkey a la King
           Serves 2- 3 people 


      Ingredients:

      1/4 Cup Margarine/ Butter (I use unsalted.)
      1/3 Cup Flour
      1 Cup Chicken or Turkey Broth
            (I use College Inn Light & Fat Free Chicken Broth.)
      1 Cup Milk
      1 Cup Turkey chunks (cooked), cut up, more if desired
       2 Cups cooked Carrots & Peas (or Mixed Vegetables)

      *****
      Sliced Bread, Toasted, 1- 2 slices/ person

      Method:
      1.  Melt Margarine/ Butter in large skillet/ large pot.
      2.  Remove skillet from Medium heat and slowly stir in Flour.
      3.  Return to heat and slowly add in Chicken Broth & Milk while slowly stirring constantly.
      4.  Continue stirring over heat until sauce is thick and bubbly. 
      5.  Add cooked Turkey chunks.
      6.  Add in cooked vegetables.
      7.  Stir and heat mixture for 1 - 2 Minutes.
      8.  Serve over toasted Bread.
      There's always some Cranberry Sauce on our table to enjoy while having this at dinner!  It's easy and delicious!   

      Enjoy!
      Yummy!
           

      Sunday, February 12, 2017

      Creamy Cheesy Pie

      Creamy Cheesy Pie
      (File Photo)
      ready to slice & serve
      My mother- in- law introduced me to Creamy Cheesy Pie.  It was decades ago when Jim & I visited his parents in Florida.  Two weeks before arriving, I had prepared a cheesecake that took 2 hours to prepare.  After making the pie crust shell, the filling was prepared.  Then, the cheesecake was baked.  It tasted so delicious, but it was so time consuming.

      On this particular visit to the sunny state I was introduced to a very easy dessert.  After dinner one night, we all enjoyed our dessert- Creamy Cheesy Pie.  It was served with a little whipped cream on top.  Oh, it was so good!  My MIL told me it was a "cinch" to make.  She was not kidding!!!  One 2- serving box of vanilla cook & serve pudding was prepared & it was combined with 8 ounces of Cream Cheese.  Then, the mixture was poured into a pre-made graham cracker crust.  Into the fridge it went to cool.  O.K. , now that is easy!!!  It's not only easy, it tastes so good!!! 

      No, I never went back to preparing that other Cheesecake again.  ;) 

      This is a dessert I make "every so often".  Cheesecake has always been a favorite dessert of mine.  Polish Cheesecake, Carrot Cheesecake & Key Lime Cheesecake are quite hard to resist in my book.  This one is too!!!

      A Few Hints:
      •  My family uses 1% Milk, so I add 1 Tablespoon powdered milk into pot before making pudding.
      • I use Jell-O brand pudding mix, because I do not burn the pot when I use the Jell-O brand.  :)

      • My son has prepared a delicious Chocolate Creamy Cheesy Pie using chocolate pudding mix.    

      Creamy Cheesy Pie


      Ingredients:
      (1) pkg. 2 serving cook & serve Vanilla Pudding Mix
      (1) pkg. 8 oz. Cream Cheese
      (2) Cups Milk
      (1) Pre-made Graham Cracker Pie Shell 

      Method:  
      1. Prepare Pudding according to package directions. 
      2. Place Cream Cheese in a medium bowl.
      3. Pour hot cooked Pudding over Cream Cheese and whisk until smooth.
      4. Pour mixture into Graham Cracker crust.  Smooth mixture to crust edges.
      5. Cool about 30 minutes.  Then, cover with plastic wrap. 
      6. Refrigerate overnight.
      7. Cut into slices.  Add whipped cream on top.
      8. Place berries on the side.
      9. Refrigerate remaining pie to enjoy again.  Yum!
      I will be making this dessert on Monday afternoon.  Topped with a little Strawberry Freezer Jam & then whipped cream. Oh yum!!!

      Will you be making one, too?  Easy + delicious!!!

      Enjoy!
      Yummy!

      Wednesday, September 14, 2016

      Saving Marigold Seeds

      2nd Generation Marigolds
      (File Photo)
      Oh yes!  It's that time of year!  Time to save the Marigold Seeds!

      All summer we've enjoyed our vibrant yellow & orange colored Marigolds.  They add a beautiful touch of color to our yard.  The plants with the orange flowers are 3rd generation from a single plant that my wonderful cute grandsons gave me for Mother's Day 2 years ago.  I have every intention of keeping that original plant family going for more years.  It's becoming a FuN tradition!  Saving the seeds to plant again next spring is my plan!  It is easy & does not take much time.

      Saving Marigold Seeds
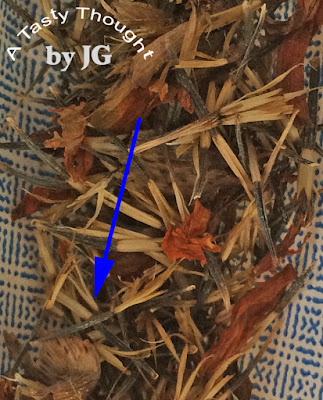
      1. Look for the dried blossoms on the Marigold plants (in lower left photo above).
      2. Break off the dried pods.
      3. Place in an open envelope to continue drying.
      4. After a month or so- when completely dry, separate all of the seeds from the pods.
      5. Place seeds in another envelope.  Label/ date/ seal envelope.
      6. Store until next year!
      Marigold Seeds

        This year I used a long planter on our deck for my "special crop"!  It's been a hot dry summer, but currently, these orange colorful flowers are overflowing the green planter.   

        3rd Generation Marigolds- 2016
        Looking forward to the 4th generation Marigolds!  I've started saving the seeds to Enjoy again!

        Friday, July 22, 2016

        Blueberries & Freezer Jam

        Local Blueberry Season is here!
        B-l-u-e-b-e-r-r-i-e-s!  Oh, yum!  It's the time of year when the local blue sweet pieces of fruit are ripe!  T'was a week of blueberries for me.

        Our winter supply is now packed away in the freezer. 


        Definitely Blueberry Freezer Jam was on my agenda, too.  On Wednesday afternoon 2 batches were prepared, separately.  The fresh Blueberries double rinsed under cool running water & drained, Certo, Sugar &  Lemon Juice were placed on my counter- ready to use.  The Ziploc Freezer Containers were washed & dried.  It was time to make the yummy homemade jam!  The directions are found inside each box of Certo.   Before I knew it, the containers were filled & the top was popped in place. 

        Then, each container was labelled/ dated including the time it was placed in the plastic Ziploc Freezer Container.  The 2 batches of Blueberry Freezer Jam sat on our dining room table making themselves for the 24 hour wait period.  After 24 hours, into the freezer each container was placed.

        If you are interested in Blueberry Freezer Jam, click here for my Helpful Hints!  Homemade Jams & Jellies taste so much better than the commercial brands!

        Do you prep/ freeze local fresh Blueberries to use the remainder of the year?

        Enjoy!
        Yummy!
           

        Friday, July 15, 2016

        Chicken Salad Platter

        Chicken Salad Platter
        Chunks of Grilled Chicken, juicy Nectarines & creamy Avocado resting on a bed of shredded lettuce!  Add a few whole Pecans, some shredded Red Cabbage & Carrots with Feta Cheese resting on top.  Now that is colorful!  Now that is so nutritious & yummy, too!

        Then Raspberry Balsamic Vinaigrette drizzled on top.  This is definitely my kind of Salad Platter for dinner.  It's been HHH lately, so after enjoying Grilled Chicken, Grilled Zucchini & a microwaved "Baked Potato" one night at dinner, a cold Chicken Salad Platter the next evening is oh so good!

        The OXO salad dressing shaker is filled with:

        Raspberry Balsamic Vinaigrette
        • 1/4 Cup Balsamic Vinegar
        • 1/2 Cup Olive Oil for salads
        • 2 teaspoons Raspberry Jam or Jelly
        Then, shake, shake, shake & shake that container again!
        Repeat & repeat again until the Jam/ Jelly is dissolved.

        If I had cold Grilled Zucchini left, I'd add it to the Salad platter, too! This is a great refreshing nutritious dinner on an HHH night!

        Yummy!
        Enjoy!

        Thursday, June 30, 2016

        Strawberry Freezer Jam

        Strawberry Freezer Jam
        Strawberry Freezer Jam is a great treat to find in the freezer during the year!  Making jams in the summer was a tradition I grew up with & have kept.  My sister & I would help our mom make jams & jellies during the heat of the summer.  That was when air conditioning was not a comfort option.  We were a one car family with my dad driving the car to work every day.  These days central air is so comfy on a hot summer day & 2 cars work great!   

        June is always the month when I purchase the quarts of locally grown strawberries from Meadowbrook Farm in East Longmeadow.  They are cleaned & prepped for our freezer.  Three quarts are saved to make three batches of Strawberry Freezer Jam.

        In the spring I purchase the 1 cup plastic freezer containers, Certo liquid pectin & needed amounts of sugar (when bags of sugar are on sale).  Lemon Juice is always in my fridge.  When Strawberry season arrives here in the Pioneer Valley, it's time to get busy!

        Three batches are prepared, but each batch is prepared separately.  The directions are found in each box of Certo for freezer & cooked jams & jellies.  It's always a good idea to read the directions before starting.

        One thing to keep in mind is to:  Follow Directions Exactly.

        Click here for my hints for making yummy Freezer Jams.

        Before I know it, it will be Blueberry Season.  :)

        Enjoy!
        Yummy!
                       

        Thursday, June 23, 2016

        Baked Taco Pie

        Baked Taco Pie
         with Fat Free Sour Cream on Top
        Scrolling through my Twitter feed a couple of weeks ago I spied an interesting recipe from Kraft Foods.  The foodie photo looked so good!  Scanning the ingredients I discovered we like each one!  It looked easy to prepare.  Even the name had the word easy in it!  Easy is good!  It didn't take long to decide this entree would be in our oven later in the week.  It was a Baked Taco Pie!

        Tortillas & the filling mixture are layered before baking.  The best casserole baking dish I have to use here was my smaller square rose colored Pyrex baking dish.  That worked great!      

        These days I'm substituting Ground Turkey for Ground Beef whenever possible in recipes.  Ohhh, cholesterol has a background with my family.  Genes play a role & choices also play a role! 

        So, I've changed the original recipe a bit & we totally liked it!  Yes, servings remained after dinner & they seasoned very well for 2 days when we enjoyed this entree again for dinner.  Tortillas are layered here, so it is filling.  Try it, you'll like it!

        Baked Taco Pie
                  inspired by Kraft  Foods

        Oven Temperature:  375°F        Time:  25- 30 Minutes

        Ingredients:
        1 lb. Ground Turkey
        1 Tablespoon Chopped Onion (dehydrated)
        1 teaspoon Chili Powder (more if desired)
        Sprinkle of Dried Basil & Sprinkle of Dried Oregano
        1 can (14.5 ounces) Diced Tomatoes, drained
        1 pkg. (10 ounce) Frozen Mixed Vegetables (Corn, Carrots, Peas, Green Beans), thawed & defrosted
        (5) 6 inch Tortillas
        1 Cup Low Fat Shredded Cheese
        Low Fat Sour Cream

        Method:
        1. Preheat oven to 375°F.
        2. Brown Ground Turkey in skillet, drain any fat.
        3. Add Chopped Onions, Chili Powder, Dried Basil & Oregano to skillet, stir.
        4. Add drained Diced Tomatoes & Corn Mixed Veggies, stir.
        5. Cook for 5 Minutes.
        6.  Spray casserole baking dish with PAM.
        7. Place 1 Tortilla on bottom. 
        8. Place 1/3 of filling mixture on top, spreading evenly.
        9. Then, place 2 Tortillas on filling mixture.
        10. Layer another 1/3 mixture on, topping with 1/2 Cup Shredded Cheese.
        11. Place 2 Tortillas on top, then filling & sprinkle on Shredded Cheese.
        12. Bake 25- 30 Minutes in 375°F oven.
        13. Cut & serve with Low Fat Sour Cream.
        Tomorrow we will be enjoying a Chicken dish in my Slow Cooker!

        Enjoy!
        Yummy!
                   

        Thursday, May 26, 2016

        Solar Green Tea

        ~Sunshine, Reflections & Flower Buds~
        It's been a Solar Green Tea kind of day!  A day when the sun is shining & it's very comfy inside and outside.  Remembering how great a glass of cold tea would taste, it was at that moment I realized that there was no Solar Green Tea in the fridge.  Quickly, the glass pitcher was filled with cold water & 2 green tea bags added.  The sunny spot in our front bow window is the place for this tea to be "brewed"!  After 3 hours, my tea was ready.  The tea bags were removed & the pitcher was covered.  Now, it's in the fridge- chilling.  It's definitely been a Solar Green Tea kind of day.  Tonight our grill will be used.

        Enjoy!
        Yummy!
           

        Wednesday, May 11, 2016

        Grilled Pork Tenderloin

        ~May 2016~
        Sometimes there's just no foodie photo!  What??!!  You may think- no foodie photo.  That is true- no foodie photo.  Dinner happened so quickly.  Instead, here's a photo taken from our driveway.  Spring is here in great splendor with flowering bushes & colorful leaves popping out! 

        Today was a sunny warm day & our thermometer read 80°F.  Such comfy weather!  Definitely grilling time!  A 1 Lb. Pork Tenderloin had been purchased yesterday & an opened bottle of BBQ sauce was in the fridge.  Dinner was quick & easy & yummy.  Bowties n Cheese, a fruit salad & slices of tender, moist, yummy grilled Pork Tenderloin.

        I like Pork cooked well done (no pink), so this method of grilling a 1 Lb. piece works so well for me.

        Grilled Pork Tenderloin

        Ingredients:
        1 Lb. Pork Tenderloin
        1/3 Cup BBQ Sauce

        Method:
          1. Heat Grill.
          2. Rinse Pork Tenderloin under cold running water.
          3. Place on a large platter.
          4. Pour about 1/3 Cup BBQ Sauce on top.
          5. Turn Pork Tenderloin over until totally coated with Sauce.
          6. Grill on one side for 14 Minutes.
          7. Using grilling tongs, turn Tenderloin over & grill other side until done.  With our grill a Medium Heat for total of 27- 29 Minutes.
          8. Remove from Grill & place on a clean plate.
          9. Let sit for 5 Minutes.
          10. Cut into slices on diagonal & serve.
          While the Pork Tenderloin was grilling, the Pasta was cooking & the salad was prepared.  Quickly dinner was ready.  It was after dinner I realized there was no foodie photo to share.

          Enjoy!
          Yummy!