Showing posts with label baked. Show all posts

Saturday, September 5, 2026

Cheesy Eggplant Parmesan

Cheesy Eggplant Parmesan
ready to be placed in our oven
(File Photo)

It's great to find that local Eggplant is now available to purchase at Farmers' Markets and at roadside stands. For me it is the time to bake Eggplant Parmesan. It is a delicious dinner and I also freeze the extra portions to enjoy when our weather gets colder. It will get colder outside before we know it. At this time of year buying local vegetables is great. 

No longer do I eat fried foods, so baking the Eggplant Parmesan works so well. It is a 2 step process, but it is easy to prep. 

A few years ago I shared the directions, so I am giving that link to my post here and below: 

Cheesy Eggplant Parmesan     

This is a great dinner! For me it is especially tasty, because it is not fried. We enjoy it served with spaghetti or penne. 

Enjoy!
Yummy!


Saturday, March 29, 2025

Butternut Squash Muffins

Butternut Squash Muffins
(File Photo)
 
Two nights ago we enjoyed yummy Butternut Squash at dinner. After dinner there was about a 1/2 Cup of the mashed veggie left in our veggie dish. It was enough of the veggie to bake a batch of Butternut Squash Muffins in the next day or two. That day was today! I am using a File Photo above, but the muffins are now cooling on a cooling rack. They are delicious with either currants or raisins. 

**Because of the high cost of Eggs these days, I used 1 Whole Egg instead of 2 Egg Whites when preparing these muffins.

It is an easy recipe! Usually, after baking and cooling, 4 of the Muffins are packed away, labeled and placed in our freezer to enjoy in a few weeks. They are a great treat to find tucked away in our freezer on another day.

Click here for my recipe, so you can bake a batch too!

Enjoy!
Yummy!


Saturday, March 9, 2024

Best Irish Soda Bread!

Best Irish Soda Bread
(File photo)

Add Buttermilk to your grocery list this week! It is one of the ingredients in Irish Soda Bread. You probably have tasted that delicious bread that is enjoyed on St. Patrick's Day. It is filled with raisins and oh so good! When you are thinking about your grocery list, add Raisins, too!

One year when I wanted to bake an Irish Soda Bread for this holiday I "googled" for a recipe that used 1 Cup of Buttermilk. The recipe I quickly found sounded so easy.  I was intrigued by the hint of soaking the Raisins in hot water and then draining them before adding the Raisins to the dough. Oh, I was hooked to try the recipe. After baking the bread and letting it cool the first bite quickly told me that I would never search for another recipe for this bread again. It was that good!  It was the Best Irish Soda Bread that I had ever tasted.  This bread was filled with plump Raisins and it was moist. Yum!

Cooled, Sliced and Ready to Eat!
(File Photo)

 
**Over the years I have learned to melt the unsalted Butter and let it cool before adding it to the dry ingredients.  It is easier to combine that way. 

Click here for the recipe

I have also learned that slices of this baked bread freeze very well.  It is a treat to take a slice out of the freezer a month later and enjoy it at breakfast.

Bake an Irish Soda Bread to enjoy on the holiday when so many of us wear the color green.

Enjoy!
Yummy!


Happy St. Patrick's Day!!!     

Sunday, December 31, 2023

Top 3 Recipes of 2023

As the year 2023 comes to a close I was viewing the recipes that you, my readers, have continually returned to.  They are foods that are continually in my cooking rotation!  My family also put them in our list of "family favorites".  I have also learned that the recipes are sought after any season of the year!  Rather than list them all, the Top 3 are listed below.  

Click on the name of the recipe to view the directions. 

Top 3 Recipes of 2023

The Baked Seafood Casserole is an entree for a special occasion.  It is delicious!

The Best Ever Irish Soda Bread recipe is sought after especially during the month of March.  At that time so many of us will be baking an Irish Soda Bread or two or three.  Filled with raisins, a slice or half slice is enjoyed at breakfast. 
***Note- Irish heritage is not needed to bake nor enjoy this bread!

A slice of the CranOrange Coffee Cake is a great dessert.  I serve a slice with a small scoop of vanilla ice cream.  So yummy!  

These are some of my favorite things!

Enjoy!
Yummy!


I wish you
a Happy
and a Healthy New Year!!!

Saturday, June 11, 2022

Pork Fried Rice

Pork Fried Rice
ready to be served!

We enjoy eating Pork Fried Rice.  In the past it was a side dish whenever we were in the mood while ordering from our fave Chinese restaurant.  Well, not anymore. It comes together so quickly when you have the ingredients on hand.

Either baked in the oven or grilled, we also enjoy Pork Tenderloin!  There are always a few slices left in the serving dish after dinner.  If there is one thing that I learned at the start of the pandemic it was-  a small amount of any food can be incorporated into another delicious dish on another evening.  This is the case with those extra slices of baked/ grilled Pork Tenderloin.

Rice is another ingredient in this dish, so whenever I make this dish, I start the Rice first.  I always make my whole recipe and later freeze the extra cooled Rice not needed at the time in a labelled/ dated freezer bag.  It's placed in my freezer ready to use in the future.  Click here for Rice Recipe
***Lately, instead of using the chicken broth I have been using only cold water

Pork Fried Rice
Serves 2- 3 people 

Ingredients:
A few slices of Baked/ Grilled Pork Tenderloin
1 and 1/4 Cups Prepared White Rice
2 Whole Eggs
2 teaspoons Olive Oil for sauteing/ baking
3/4 Cup frozen Peas
4- 6 teaspoons Soy Sauce- I use low sodium.

Method:

  1. Prepare Rice.
  2. Cut Baked/ Grilled Pork Tenderloin slices into small pieces, set aside.
  3. Scramble 2 Whole Eggs, set aside.
  4. Add 2 teaspoons Olive Oil for sauteing/ baking to large skillet. Heat.
  5. Remove skillet from heat and place cooked/ prepared Rice in large skillet.
  6. Heat Rice by stirring.
  7. Add frozen Peas and combine.
  8. Add Soy Sauce to skillet and combine all. 
  9. Add Pork Tenderloin pieces and Scrambled Eggs and combine everything.
  10. Heat all thoroughly and serve when Peas are tender.

When you have any extra slices of the Pork Tenderloin after dinner, this is a great meal to prepare for Part II. It is easy and it is also delicious!

Enjoy!
Yummy!

Thursday, January 6, 2022

Top Post of 2021!

Baked Taco Pie!
(File Photo)

Tonight's dinner is baking in our oven.  It is also the top blog post that I wrote for last year- in 2021! Drum roll here,
da dum... Baked Taco Pie!

Ground Beef, corn, diced tomatoes, tomato sauce and shredded cheeses layered between tortillas. Oh, there are herbs and spices in the mix, too. It's served with a dollop of sour cream. Oh Yum!

We have extra portions, so they always have a spot in our freezer for a quick and easy future dinner.

Click here for my recipe. It's that good!

Enjoy!
Yummy!

Tuesday, February 2, 2021

~Baked Taco Pie~

~Baked Taco Pie~
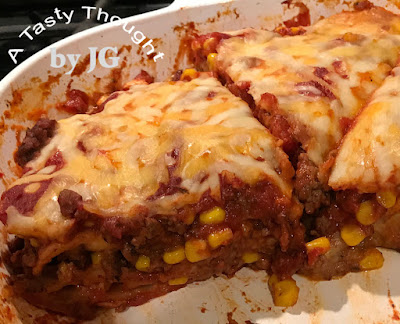
cut into slices


One afternoon last week I was deciding what to prepare for dinner.  "What am I going to make?" is a question that seems to be on my mind a lot.  We had tortillas and ground beef in the fridge, so that was a start.  Then, I remembered a dinner that I had not prepared in quite some time.  It was Baked Taco Pie!  Some of the ingredients are browned ground beef, corn, tomato sauce and tortillas.  Suddenly, I knew it would be served at dinner.

The recipe is so easy to prepare and then it is baked.  I've changed it up a bit from the original recipe and I like it even better.  Add a little Sour Cream on top when serving!

***I use a baking dish that the Tortillas will fit in easily.  We do not always purchase the same size Tortillas, so I use whatever size in in our fridge.

This is a very tasty dinner!!     

Baked Taco Pie      

        Oven Temperature:  375°    Time:  30- 35 Minutes   

Ingredients: 

1 lb. Ground Beef
2 teaspoons Chopped Onion (dehydrated)
1 teaspoon Chili Powder
Sprinkle of Dried Basil
Sprinkle of Dried Oregano
1 can (14.5 ounces) Diced Tomatoes (drained)
1 pkg. Frozen Corn (10 ounces) thawed/ defrosted
(6) 7" or 8" or 9" ***Tortillas
1 Cup shredded Cheese- can be low fat
1 can (15 ounce) Tomato Sauce
Sour Cream

Directions:

  1. Preheat Oven to 375° F.
  2. Brown Ground Beef in skillet, drain any fat.
  3. Add Chopped Onions, Chili Powder, Basil & Oregano. Stir.
  4. Add drained Diced Tomatoes & Corn. 
  5. Stir in 1 Cup Tomato Sauce.
  6. Cook for 5 Minutes in skillet.
  7. Spray casserole baking dish with PAM.
  8. Place 1/4 Cup Tomato Sauce on bottom of baking dish, spread.
  9. Place 2 Tortillas on Sauce.
  10. Add 1/3 filling mixture on top.  Spread evenly.
  11. Place 2 Tortillas on filling.
  12. Add 1/3 filling on Tortillas.  Spread evenly.
  13. Sprinkle on 1/2 Cup Shredded Cheese.
  14. Then, add 2 Tortillas on Filling mixture.
  15. Add remaining filling mixture on top, spreading evenly.
  16. Pour remaining Tomato Sauce on top, spread evenly.
  17. Then, sprinkle on remaining Shredded Cheese.
  18. Bake 30- 35 Minutes in 375° Oven.
  19. Cut into slices and serve.
  20. Top with sour cream.

This is a very easy dish to prepare!  Before you know it, the oven timer will buzz it's done.  It is a hearty dish for this time of year.  If you have any slices left after dinner, they may be frozen to enjoy for another dinner.

Enjoy!
Yummy!


Friday, May 1, 2020

Chicken Enchiladas

Chicken Enchiladas
These days living our daily lives dealing with COVID- 19, grocery shopping has become a planned activity.  There's no more making a short list and popping in to your favorite grocery store.  It's much easier to purchase ingredients that will be used in meals that we can enjoy for 8- 10 days.  The pound of Haddock that's purchased is prepared and enjoyed that night, like usual.  However, there are no longer 3 items on our grocery list.  It has become a larger list!  So, a slightly larger amount of chicken can be purchased, then grilled or baked.  There are easy meals to prepare and to enjoy with those extra slices of chicken the next night.  I talking Chicken Enchiladas!  Packaged Tortillas and Salsa need to be added to your grocery list if you are planning on enjoying this dinner one night, soon!

It's easy to prepare because the chicken has already been cooked!  The extra slices are cut into small pieces and mixed with sour cream, shredded cheese and a few other ingredients.  A small amount is placed on each tortilla before wrapping and placing into a baking dish.  About 30 minutes later Chicken Enchiladas will be ready for dinner.

Yes, I have written complete directions for this recipe before and it can be found here.

Last night we enjoyed them.  It sure was a quick and easy dinner to prepare!  Add tortillas and salsa to your grocery list whenever you will be baking/ grilling chicken.  A few slices of the chicken is key to another delicious dinner!  Leftovers?  Oh, no!  Those extra slices are the main ingredient to a very delicious dinner.  

Enjoy!
Yummy!


Monday, December 30, 2019

Baked Seafood Casserole

Baked Seafood Casserole
(File Photo)
New Year's Eve is now in my thoughts!  Soon it will be 2020!  It also had me thinking- what will we be enjoying for dinner that night???  I've been paying attention to what you, my friends, have been reading on my foodie blog, lately.  I now have the answer!  Baked Seafood Casserole!  The delicious seafood dinner that is baked in individual casserole dishes.  That seafood dinner that is oh so easy to prepare and tastes so good!

Ready to enjoy!
(File Photo)
Just imagine- holding your fork and digging into the bubbling topping!  Reaching in for a small piece of seafood.  Maybe part of the baked Haddock.  Or maybe a baked Shrimp!  Or just maybe part of a baked Scallop!  It is definitely a great entree for a special evening.  If you have company and they enjoy seafood, they will certainly enjoy this.

It's a dinner that I bake during the colder months of the year, because it requires 45 minutes in the oven.  While it's baking I work on the Rice side dish and also a salad.

Click here for my recipe!  Place the ingredients on your grocery list!  Baked Seafood Casserole is delicious! 

Enjoy!
Yummy!
        

Sunday, October 15, 2017

Cheesy Eggplant Parmesan

Cheesy Eggplant Parmesan ready for the oven!
Eggplant Parmesan with Spaghetti is just so good!  In days past I enjoyed ordering this entree when we dined at an Italian restaurant.  Then, I decided to stop eating the batter dipped fried Eggplant slices.  It's not that they were not totally delicious, I didn't want to eat fried foods.  Now, I enjoy preparing this entree, but I bake it.  Actually, double bake the Eggplant.  Whenever I bake a batch, extra portions are packaged/ labelled/ dated for our freezer. It's a great take- out dinner from my kitchen!

I've been baking this for a while, but now I've also changed my original recipe.  When preparing it, place a combination of Ricotta Cheese + Mozzarella Cheese on top of the Eggplant round after placing the Eggplant in the baking dish.  Then, top with a second round of Eggplant.  That extra yummy taste of  creamy Ricotta Cheese sandwiched between Eggplant slices!

Bake a batch!  It's so good!      
  
Cheesy Eggplant Parmesan

Ingredients:
2 Eggplants
Olive Oil for baking & sauteing
Basil
1 Cup Ricotta Cheese-  can be low fat or fat free
8 ounces Shredded Mozzarella Cheese
(1) 15 ounce can Tomato Sauce
(1) 8 ounce can Tomato Sauce
Oregano
1 Green Pepper (chopped) and/ or 1 Zucchini Squash (chopped)

Method:
  1. Preheat oven to 450°F. 
  2. Line a large cookie pan with foil, spray with PAM.
  3. Wash & dry all vegetables.
  4. Cut each Eggplant into 3/4" rounds.  ***Cut an even number of rounded slices. 
  5. Place each Eggplant round on cookie sheet. 
  6. Drizzle a small amount of Olive Oil for baking & sauteing on top of each round.
  7. Then, lightly sprinkle with Basil. 
  8. Bake Eggplant for 20 Minutes in 450°F. 
After Eggplant has been removed from oven, lower oven temperature to 350°F.

***While Eggplant is baking:
  1.  Spray a large baking dish with PAM.
  2.  Place a small amount of Tomato Sauce in baking dish, covering bottom of dish.
  3.  In a bowl, combine 1 Cup Ricotta Cheese and about 3 ounces of Mozzarella Cheese.

    After Eggplant comes out of the oven:
  4.  Place half of baked Eggplant rounds in baking dish.
  5.  Place Cheese mixture on top.
  6.  Place an Eggplant round on top of cheese. Sprinkle on Oregano.
  7.  Top with Sauce.
  8.  Sprinkle on Mozzarella Cheese.
  9.  Add chopped Green Pepper and/ or chopped Zucchini to baking dish- around Eggplant.
  10.  Cover the vegetables with all the remaining sauce.
  11.  Bake for 30- 35 Minutes until Eggplant is soft.
  12.  Serve with Spaghetti. 
This is a delicious dinner using fresh vegetables!  No longer do I miss ordering Eggplant Parmesan at an Italian restaurant.  :)

Enjoy!
Yummy!
  

Thursday, September 21, 2017

Baked Haddock Casserole

Baked Haddock Casserole
Who would guess that under the crushed "hint of salt" Ritz crackers is a light covering of shredded cheese & Parsley flakes?  Under that is an individual sized portion of Haddock or Cod.  There's also the light sprinkling of Parsley, Paprika & Basil on the fish. 
Baked Haddock Casserole!  This is such a delicious entree! 

My Fiestaware individual sized casserole dishes are perfect for baking this yummy seafood.  It can be prepared any time during the year using fresh or defrosted Haddock.

We've enjoyed this at dinner so many times during the past year.  Last summer when we were at the Cape (Cape Cod in MA) we stopped in for dinner at a favorite restaurant in Orleans, MA- Rock Harbor Grill.  At dinner that evening we had a yummy baked fish entree, only it contained sausage in the topping.  Considering that I am watching my cholesterol, I decided to make a similar dish at home minus the sausage.  I add Paprika for the extra kick here.  To be honest, I do not see a difference in taste.

The fish is light & moist in this casserole.  The cheese & herbs give it a great taste.  It has become one of our favorite dinners on a cold New England night.

Bake this entree some evening!  It is so good!    

Baked Haddock Casserole
     2 servings  

Oven Temperature:  350°F          Time:  45 Minutes

Ingredients:
2 pieces (1/2 lb. each) Captain's Cut Haddock (- thick pieces)
1/8 teaspoon Parsley Flakes
1/8 teaspoon Paprika
1/8 teaspoon Basil
3- 4 ounces shredded Mozzarella or Mozzarella/ Cheddar Cheese combo
15 Hint of Salt Ritz Crackers, crushed   OR   2/3 Cup Bread Crumbs

3 Tablespoons Butter/ Margarine, melted
1/3 teaspoon Garlic Powder
1/2 teaspoon Worcestershire Sauce

Method:
  1. Butter individual baking dishes.
  2. Rinse Haddock under cool running water.
  3. Place in baking dish.
  4. Sprinkle on Parsley Flakes.
  5. Then, sprinkle on Paprika & Basil.
  6. Cover with shredded Cheese.
  7. In a small bowl combine crushed Ritz Crackers  OR  Bread Crumbs & Garlic Powder.
  8. Add melted Butter/ Margarine & Worcestershire Sauce.  Combine well.
  9. Spread half of Mixture Topping on top of each baking dish.
  10. Bake at 350° F for 45 Minutes.
I find the crushed Ritz crackers work well here as do the Bread Crumbs, so I use either.  

This entree is just delicious!  There's no need to enjoy it only at a restaurant!  Serve it at home with a Salad & a Baked Potato!

Enjoy!
Yummy!


Thursday, June 23, 2016

Baked Taco Pie

Baked Taco Pie
 with Fat Free Sour Cream on Top
Scrolling through my Twitter feed a couple of weeks ago I spied an interesting recipe from Kraft Foods.  The foodie photo looked so good!  Scanning the ingredients I discovered we like each one!  It looked easy to prepare.  Even the name had the word easy in it!  Easy is good!  It didn't take long to decide this entree would be in our oven later in the week.  It was a Baked Taco Pie!

Tortillas & the filling mixture are layered before baking.  The best casserole baking dish I have to use here was my smaller square rose colored Pyrex baking dish.  That worked great!      

These days I'm substituting Ground Turkey for Ground Beef whenever possible in recipes.  Ohhh, cholesterol has a background with my family.  Genes play a role & choices also play a role! 

So, I've changed the original recipe a bit & we totally liked it!  Yes, servings remained after dinner & they seasoned very well for 2 days when we enjoyed this entree again for dinner.  Tortillas are layered here, so it is filling.  Try it, you'll like it!

Baked Taco Pie
          inspired by Kraft  Foods

Oven Temperature:  375°F        Time:  25- 30 Minutes

Ingredients:
1 lb. Ground Turkey
1 Tablespoon Chopped Onion (dehydrated)
1 teaspoon Chili Powder (more if desired)
Sprinkle of Dried Basil & Sprinkle of Dried Oregano
1 can (14.5 ounces) Diced Tomatoes, drained
1 pkg. (10 ounce) Frozen Mixed Vegetables (Corn, Carrots, Peas, Green Beans), thawed & defrosted
(5) 6 inch Tortillas
1 Cup Low Fat Shredded Cheese
Low Fat Sour Cream

Method:
  1. Preheat oven to 375°F.
  2. Brown Ground Turkey in skillet, drain any fat.
  3. Add Chopped Onions, Chili Powder, Dried Basil & Oregano to skillet, stir.
  4. Add drained Diced Tomatoes & Corn Mixed Veggies, stir.
  5. Cook for 5 Minutes.
  6.  Spray casserole baking dish with PAM.
  7. Place 1 Tortilla on bottom. 
  8. Place 1/3 of filling mixture on top, spreading evenly.
  9. Then, place 2 Tortillas on filling mixture.
  10. Layer another 1/3 mixture on, topping with 1/2 Cup Shredded Cheese.
  11. Place 2 Tortillas on top, then filling & sprinkle on Shredded Cheese.
  12. Bake 25- 30 Minutes in 375°F oven.
  13. Cut & serve with Low Fat Sour Cream.
Tomorrow we will be enjoying a Chicken dish in my Slow Cooker!

Enjoy!
Yummy!
           

Friday, May 6, 2016

~Blueberry Delisimo~

Blueberry Delisimo
This Sunday is a special day- Mother's Day!!!  All week we have seen advertisements in the newspaper, online & on t.v. reminding us to "get something" special for your mom.  "Getting something" on Sunday that is a very yummy homemade dessert would be an extra special treat!

Days are filled with much to do, so a dessert that takes care of itself in your oven is the way to go.  Blueberry Delisimo topped with vanilla ice cream is oh so good!  It's the dessert that does not look appealing before the baking dish is placed in the oven. 

Before baking in the oven.
Then, magic occurs!  While baking, suddenly there's aromas of Blueberries & Cinnamon.  After the timer buzzes & the oven door is opened, Blueberry juices are bubbling on the edges of the baked cake inside the baking dish!   

This dessert is definitely a family fave.  Many years ago when our older son was "back home" working a late shift, he'd return home exhausted in the wee hours of the morn.  Yes, every night a nutritious dinner was waiting in the fridge for him to microwave.  As the story goes- One night he spied a Blueberry Delisimo first in the fridge.  A spoon, a t.v. & a comfy chair were located.  Spoonful after spoonful was well- delicious!  Suddenly the rose colored Pyrex baking dish was e-m-p-t-y.  Dinner had been cold, yummy & filling.  It was dessert!  From the next day on, this Blueberry dessert was named Blueberry Delisimo.  It is one tasty dessert!

Blueberry Delisimo
Oven:  350°F    Time:  55- 60 Minutes 

Ingredients 
2 Cups Blueberries, defrosted & drained, if not fresh
1 Tablespoon Lemon Juice - I use Realemon.
1 teaspoon additional Flour
1/2 Cup Sugar
1 Cup Flour  
1 teaspoon Baking Powder
1/4 teaspoon Salt
3 Tablespoons solid Crisco shortening
1/2 Cup Milk, can be Soy Milk 
_____________  
Topping
1/2 Cup Sugar
1/4 teaspoon Cinnamon
1 Tablespoon Cornstarch
_____________
7/8 Cup Hot Water - boiled or microwaved for 1 and 1/2 Minutes

Method
  1.  Preheat oven to 350°F. 
  2.  Spray PAM in a glass 8"x8" pan. 
  3.  Place Blueberries in pan.
  4.  Sprinkle on the Lemon Juice & the 1 teaspoon additional Flour.
  5.  In a small bowl combine Sugar, Flour, Baking Powder & Salt.  
  6.  Add solid Crisco shortening.  Blend with pastry blender.
  7.  Add Milk, stir together.
  8.  Place spoonfuls of mixture over Blueberries.  Then, spread mixture over Blueberries.
  9.  In another small bowl, combine additional Sugar, Cinnamon and Cornstarch.  Sprinkle over batter.
  10.  Heat water.  Pour water over entire mixture in pan, making sure all dry ingredients are covered with water.
  11.  Bake at 350°F for 55- 60 Minutes - until brown on top.  (Use a cake tester, too.)
  12.  When serving, place the berries on the top in dessert dishes. Top with a scoop of vanilla ice cream.
  13.  Cover and refrigerate any leftover dessert.
***I've been asked about the unusual 7/8 Cup of water.  The reason:  When I used 1 Cup, the blueberry juice bubbled up and my oven was a mess.  When using 3/4 Cup water this dessert was too dryMy solution - 7/8 Cup easily measured with my Pyrex liquid measuring cup worked well.  :)

This is one mighty fine dessert to share with your Mom!  

Enjoy!
Yummy!


And To all Moms,
Happy
Mother's Day!!!

Friday, March 25, 2016

Sassy Raisin Sauce

Two ingredients in Sassy Raisin Sauce
Raisins & Apple Juice
Are you serving Baked Ham this Sunday for dinner?  If you are, Sassy Raisin Sauce is a yummy topping for the tender slices of Ham!  Filled with Raisins, it's an easy sauce to prepare at the last minute.  You probably already have the ingredients:  Apple Juice, Raisins, Cornstarch & Butter/ Margarine

Think Sunday- you are almost ready to serve dinner.  It's at this time that a tasty topping that comes together so quickly is needed!  What a great added touch!  And- it tastes so good. 

I also like to serve this topping over Butternut Squash Ravioli!

Sassy Raisin Sauce
Yield: about 2 and 1/2 Cups

Ingredients:
3 Tablespoons Cornstarch
2 Cups Apple Juice
2 Tablespoons Butter/ Margarine
1 Cup Raisins

Method:
  1. Place Cornstarch in small saucepan.
  2. Slowly add in 1/2 Cup Apple Juice.
  3. Stir, dissolving Cornstarch.
  4. Then, add remaining Apple Juice to saucepan, stir.
  5. Add 2 Tablespoons Butter/ Margarine.
  6. Add Raisins.
  7. Stir constantly while cooking over medium heat.
  8. Sauce will thicken & boil.
  9. Boil & stir for 1 Minute.
  10. Serve hot.
If a smaller amount is desired use directions above & the ingredients below-  

     For 2 Servings:  
     1 Tablespoon Cornstarch
     2/3 Cup Apple Juice
     About 1 Tablespoon Butter/ Margarine
     1 Handful Raisins

This is always a great addition to a Baked Ham Dinner!  Or as a Butternut Squash Ravioli Topping!

Enjoy!
Yummy!


Happy Easter!!!

Friday, March 11, 2016

Baked Seafood Casserole

Baked Seafood Casserole
with Scallops, Shrimp & Haddock

Baked Seafood Casserole!  Oh, yum!  For many years whenever this entree was on the menu at a seafood restaurant I thought well, maybe, mmm, but not today.  I'd order the Broiled Seafood Platter.  Well, that changed a couple of years ago.  We were at the Rock Harbor Grill at the Cape (Cape Cod, MA).  The restaurant was totally packed with couples & families on a September weekday evening.  Everyone was chatting & enjoying their dinners.  Once again one choice on the menu was Seafood Casserole.  I took the plunge & decided to try it.  Let me tell you- it was so yummy!  From that day on I bake Seafood Casseroles at home!  No need to enjoy this delicious entree only at a restaurant.  Why did it take me so long to taste it???
   
The first time I was thinking about baking this, I realized that the much needed individual baking dishes were not in my cabinet!  It was time to get 4 pieces of colorful FiestawareIt's been on my wish list.  I needed individual casserole dishes, so the time had come to purchase some.  They sure work well when baking a Seafood Casserole!    

After looking at so many recipes for this yummy dish, I decided to include 3 types of seafood that are easily available to me.  Uncooked Shrimp is always in my freezer & only needed to be defrosted.  Scallops & a piece of Haddock can be purchased quickly.

A Baked Seafood Casserole is so easy to make!  The seafood is placed in the bottom of buttered individual serving/ baking dishes.  Add a little shredded Cheese.  Crush hint of salt Ritz Crackers & combine with Worcestershire Sauce, Garlic Powder & melted Butter to sprinkle on top.  Bake in the oven for 45 minutes & the yummy Seafood Casserole is ready.  How easy can this be?  Absolutely delicious, too!

Tender Baked Seafood
under the Bubbly Topping

Baked Seafood Casserole
     2 servings

Oven Temperature:  350°F            Time: 45 Minutes

Ingredients:
6 small Scallops
8 medium uncooked Shrimp, peeled & deveined
about 2/3 lbs. Haddock fillet
3-4 ounces shredded Cheese (Mozzarella or Cheddar Combo)
15 with a hint of salt Ritz Crackers, crushed
3 Tablespoons melted Butter/ Margarine
1/3 teaspoon Garlic Powder
1/2 teaspoon Worcestershire Sauce

Method: 
  1. Butter individual baking dishes.
  2. Remove shells from Shrimp, devein.
  3. Cut Haddock Fillet in half.
  4. Rinse seafood under cool running water, drain.
  5. Place Scallops & Shrimp in baking dishes.
  6. Place Haddock on top, folding narrow ends under.
  7. Cover with shredded Cheese.
  8. In a small bowl combine crushed Ritz Crackers & Garlic Powder.
  9. Add Worcestershire Sauce & melted Butter/ Margarine, combine all.
  10. Spread half of Topping Mixture on seafood in each baking dish.
  11. Bake at 350°F for 45 Minutes.
***I placed the individual baking dishes on a cookie pan before baking.  It prevented any possible spills when taking out of my oven.  :)

We enjoyed this Seafood Casserole at dinner, again tonight.  Working quickly, it took about 30 Minutes to prepare before baking.  This is one great entree!  Don't wait to order it at a restaurant!  It's that good!  Served with Rice & a veggie, yum! 

Have you baked a Seafood Casserole? 

Enjoy!
Yummy!
           

Monday, October 5, 2015

Apple Crisp with Craisins/ Raisins

Apple Crisp with Craisins/ Raisins
Needs a small scoop of Vanilla Ice Cream!
The month of September when we began to enjoy biting into crisp juicy locally grown apples has come & gone!  Yes, I've been cooking & baking, but not taking photos.  Two weekends ago we attended a beautiful family wedding "on the beach".  A drive east to the Cape (Cape Cod) to celebrate with family & friends.  It was a perfect day for the handsome groom & his beautiful wife.  Our young grandsons enjoyed getting their feet wet after the ceremony!  Amazing how great the sun felt on that warm Saturday afternoon.  Now, our weather has definitely gotten a bit chillier!               

Returning back home reminded me of the fresh apples & also desserts where the delicious fruit is the key ingredient.  Yum, yum, yum!  If I were to choose the 1 dessert that can be prepared quickly and my family always enjoys, it would be Apple Crisp!  Baked apple slices with a crunchy oat topping that has a hint of Nutmeg & Cinnamon- ahhhhh!  It's a dessert that is enjoyed by our family & friends, any time of year.  It can also be transported very easily when baked in a disposable baking dish.

Usually in the first Apple Crisp I bake every autumn McIntosh Apples are the star.  Now, that's because they are the first baking apple I can use.  As soon as the Cortland Apples hit the scene, those are my apples of choice.  As the seasons change, Empire Apples taste so good in this yummy dessert.

Have you baked this dessert?  While preparing it don't forget to add in a few Craisins & Raisins!

Apple Crisp with Craisins/ Raisins

Oven Temperature: 375°F
Time: 45 - 50 Minutes   

Ingredients:
6 - 7 peeled sliced large apples - I use McIntosh, Cortland
       &/or Empire apples
3/4 Cup Brown Sugar
1/2 Cup Flour
1/2 Cup Old Fashioned Oats
3/4 teaspoon Cinnamon
3/4 teaspoon Nutmeg
1/3 Cup + 1 Tablespoon softened Butter or Margarine
1/4 Cup Craisins
1/4 Cup Raisins

 Method:
  1.   Preheat oven to 375°F.
  2.   Spray PAM in 8" x 8" glass baking pan/ dish.
  3.   Rinse apples under cold running water & dry.
  4.   Peel & slice apples.
  5.   Place peeled/ sliced apples in pan/ dish.
  6.   Add Craisins & Raisins and mix in. 
  7.   Thoroughly mix remaining ingredients together in small bowl.
  8.   Sprinkle over apples. 
  9.   Bake 45- 50 Minutes or until apples are tender
  10.   Serve warm or chilled with a small scoop of vanilla ice cream.  
  11.   When cool, cover & refrigerate any leftovers.
This apple dessert is so good served warm or chilled.  We always enjoy topping it with a small scoop of Vanilla Ice Cream! 

Enjoy!
Yummy!

Saturday, April 18, 2015

Pine-Apple Pear Crisp

Needs a small scoop of Vanilla Ice Cream!
Last week after celebrating Easter there were a few leftovers in the fridge.  What treasures!  I'd used the crushed Pineapple in a very old family fave recipe for Polish Cheesecake.  Triple Yum!  Now it's been weeks since I'd baked a Crisp, so the dessert with baked fruit that's topped with crunchiness was on my mind!  Yes, I'm back to peeling & slicing Apples!  All of the ingredients were on hand. No pun intended.  In addition to the Apples, I spied 2 Pears, so I was on my way.  We also had Vanilla Ice Cream in the freezer. 

Crushed drained Pineapple was added to the slices of Pears & Cortland Apples in my rose colored Pyrex baking dish.  Then, Craisins were sprinkled in.  They always add a great flavor to a Crisp.

While this dessert was baking the aroma of the sweet fruits was so yummy!  After it cooled we enjoyed digging our spoons into our servings.  Yes, a scoop of Vanilla Ice Cream was on top. 
Pine-Apple Pear Crisp
is so good!

Pine-Apple Pear Crisp

Oven Temperature: 375°F
Time: 45 - 50 Minutes

Ingredients:
 4 - 5 peeled sliced large apples - I use McIntosh, Cortland
       &/or Empire apples
2 ripened Pears, peeled, cut into slices
8 ounces crushed Pineapple, drained
3/4 Cup Brown Sugar
1/2 Cup Flour
1/2 Cup Old Fashioned Oats
3/4 teaspoon Cinnamon
3/4 teaspoon Nutmeg
1/3 Cup + 1 Tablespoon softened Butter or Margarine
1/4 Cup Craisins

Method:
  1.  Preheat oven to 375°F.
  2.  Spray PAM in 8" x 8" glass baking pan.
  3.  Rinse Apples & Pears under cold running water & dry.
  4.  Peel & slice Apples & Pears. 
  5.  Place peeled sliced Apples & Pears in pan. 
  6.  Add Craisins and mix in. 
  7.  Thoroughly mix remaining ingredients together in small bowl.
  8.  Sprinkle over apples. 
  9.  Bake 45- 50 Minutes or until Apples & Pears are tender. 
  10.  Serve warm or chilled with a small scoop of vanilla ice cream. 
  11.  When cool, cover & refrigerate any leftovers.
Whenever I have extra crushed Pineapple, this will be my "go to" dessert!

Enjoy!
Yummy!
       

Thursday, September 11, 2014

Baked Eggplant Parmigiana

Baked Eggplant Parmigiana
Do you have a couple of Eggplants?  Whenever I see a display of Eggplants suddenly an image of Eggplant Parmigiana comes to mind!  A forkful smothered in tomato sauce is so good.  Usually the Eggplant has been fried, so I tend to stay away from ordering it when dining out.  Not that I don't enjoy the taste, it's that cholesterol thing with me.  I try to save fried foods for that once in a blue moonLike the Whole Belly Clam Roll served with tartar sauce & a side of Cole Slaw- when we were at the Cape.

For the past 3 years I've enjoyed Eggplant Parmigiana, but the Eggplant is baked, not fried.  While thumbing through a recipe booklet from one of our local grocery stores, the recipe caught my eye.  Now, when these veggies are in season locally here, I like to bake a batch a couple of times.  Definitely there are more servings remaining after dinner.  This freezes very well and can be reheated in the microwave on a busy night.  It's easy, it's delicious!  What can be better?

You guessed it.  Sunday's trip to Meadowbrook Farm in East Longmeadow included Eggplant.              

Baked Eggplant Parmigiana  
     adapted from Big Y Life in Balance

Ingredients:
PAM  
Olive Oil for baking & sauteing 
(2) small Eggplants
Ground Pepper
Basil
Garlic Powder
Oregano
Tomato Sauce (about 16 oz. - 20 oz.) 
(1) can 6 oz. Tomato Paste
8 oz. shredded Mozzarella
 

Method:
  1. Preheat oven to 450°F.
  2. Line a large cookie pan with foil and spray with PAM.
  3. Wash & dry Eggplants. 
  4. Cut each Eggplant into 1" round slices.  Cut an even number of round slices.
  5. Place each slice on cookie sheet and drizzle a small amount of Olive Oil on top of each slice.
  6. Then, lightly sprinkle with Ground Pepper & Basil.
  7.  Bake Eggplant slices for 20 minutes in 450°F oven. 
After slices are baked, remove from oven and lower oven temperature to 350°F.

*While Eggplant is baking continue prepping:  
  1. Spray a large baking dish with PAM.
  2.  Mix Tomato Sauce with Tomato Paste in a small bowl. 
  3.  Place a small amount of sauce mixture in baking dish, covering bottom.
  4.  Place baked Eggplant slices on bottom of baking dish.  Top each slice with shredded Mozzarella Cheese.  Then, top with another slice of Eggplant.  Place sauce mixture on top.  Sprinkle on Garlic Powder & Oregano.  
  5. Then top with more Mozzarella Cheese.  
  6. Bake for 30- 35 minutes or until Eggplant is soft. 
  7. Serve with Penne. 
For an extra great taste, I sauted 1 Green Pepper after cutting it into slices & added it to the sauce before baking.  That extra flavor was great!  Bake Eggplant Parmigiana soon!

Enjoy!
Yummy!
     

Friday, November 22, 2013

Baked Apple Butternut

A serving spoon full of steaming Baked Apple Butternut!
A little steaming baked Butternut Squash and a bit of hot Cortland Apple combined on the fork!  Oh, yum!  I had not baked this side dish in quite a few years.  Every year I have good intentions, but all of the purchased Butternuts get steamed/ mashed and then packaged in the Ziploc qt. sized Freezer Bags to enjoy on holidays and during other special dinners during the year.  Not this autumn!

There were 2 Butternut Squash left in the cardboard carton.  I had Cortland Apples.  I had plans!  The Cornflower CorningWare dish was located and I was good to go!  Yes, I still have my treasured Cornflower.  They do last a lifetime!  The combination of baked Butternut Squash + baked Apples is delicious!  Add in the Cinnamon & the Nutmeg - ah, great flavor!  In this recipe softened Butter/ Margarine is combined with the spices + a little flour and Brown Sugar.   

The addition of 1/4 Cup of Craisins or Raisins or a combo of both would be so tasty here and also colorful!  However, a baking dish of Apple Crisp with Craisins/ Raisins was in our fridge, so the Craisins & the Raisins did not make the cut here.

Before covering with foil & placing in 350°F oven.
Baked Apple Butternut
Oven Temperature:  350°F     Time:  60- 70 Minutes

Ingredients:
2 Butternut Squash
2- 3 large Apples (Cortland, Empire or Granny Smith)
****
2 teaspoons Flour
1/4 teaspoon Cinnamon
1/4 teaspoon Nutmeg
1/3 Cup Brown Sugar
3 Tablespoons softened Butter/ Margarine

Method:
  1. Spray a 10" x 10" Baking Dish with PAM.
  2. Preheat oven to 350°F.
  3. Rinse Butternut Squash & Apples under cool running water, dry.
  4. Cut off stem & rounded top of Squash, toss.  
  5. Cut long portion of Squash into slices.  Cut off peel.  Then cut into 1" chunks. 
  6. Remove seeds from bottom and cut remaining Squash into pieces.
  7. Place Squash chunks/ pieces in Baking Dish.
  8. Peel & slice Apples.
  9. Place Apple slices on top of Squash in Baking Dish.
  10. In small bowl, combine remaining ingredients for topping. 
  11. Place topping on Apple Slices.
  12. Cover with Aluminum Foil.
  13. Bake in preheated 350°F oven for 60- 70 minutes, or until Squash chunks are tender. Use fork to pierce.
***If adding 1/4 cup Craisins/ Raisins, add on top of Butternut Squash Chunks/ Pieces, after Step #7.

This is a yummy side dish!  The flavors blend well together.  After our dinner, the extra portions were packed in Ziploc Freezer containers/ labelled and into our freezer they went.  What a welcome surprise at dinner this will be on a cold windy bleak winter New England night!

Do you serve Butternut Squash?  It's always on our Thanksgiving Day Dinner table

This weekend I'll be baking the Yummy Apple Breads and freezing them! 

Enjoy!
Yummy!
      

Friday, February 22, 2013

Crab Meat Stuffed Fillet of Sole

Crab Meat Stuffed Fillet of Sole
Last week as I was walking past the fresh Seafood Counter in my local grocery store, Big Y, the Fillet of Sole sure caught my eye!  Suddenly, I recalled a recipe that I had not baked for a number of years:  Crab Meat Stuffed Fillet of Sole.  Yum!

Quite a while ago so long ago that my older son would ride in the grocery cart while we were doing our weekly shopping the always cheerful, helpful woman at Food Mart's Seafood Counter would see me every week.  One day as I glanced at the Fillet of Sole, she asked if I had ever baked Stuffed Sole.  I responded that I had not.  She then went on to explain how EASY it was.

She had no name for this recipe - just verbal instructions.  Oh, it was worth a try - I was learning how to deal with Fish and if you do not try - you do not learn.  I baked the fish using my new recipe that evening.  It was delicious - scrumptious!  The next week I went back to the Seafood Counter and purchased another 1 lb. of Fillet of Sole.  Once again, we dined on Stuffed Fillet of Sole, but I added about 6 oz. of canned Crab Meat into the stuffing... Crab Meat Stuffed Fillet of Sole!  

Out of the Oven... Ready for Dinner
Every so often I remember this recipe that I made so often, years ago... sometimes with, sometimes without the Crab.  A few months ago canned Crab meat was on sale, so I purchased 2 cans, with this recipe in mind!

Crab Meat Stuffed Fillet of Sole   

Oven Temperature:  350°F        Yield:  3- 4 Servings
Time:  22 Minutes

Ingredients:
1 lb. Fillet of Sole- larger fillets to roll
5-6 oz. Crab Meat, cooked
1 Tablespoon Olive Oil for sauteing & baking
1 Carrot, shredded
1 teaspoon Parsley
2 slices bread, crusts removed
1/4 teaspoon Thyme
2 Tablespoons Lime Juice or Lemon Juice

Method:
  1. Preheat oven to 350°F.
  2. Spray baking dish with PAM.
  3. Add 1 Tablespoon Lime Juice or Lemon Juice to baking dish.
  4. Shred Carrot.
  5. Heat 1 Tablespoon Olive Oil in saute pan.
  6. Saute shredded Carrot.
  7. Add 1 teaspoon Parsley to pan.
  8. Remove crust from bread.  
  9. Tear bread slices into small pieces & add to pan.
  10. Add 1/4 teaspoon Thyme to mixture.  Combine.
  11. Add Crab Meat.  Combine.
  12. Rinse Fillets of Sole under cold running water.
  13. Place on paper towel covered plate, to drain.
  14. After placing 1 Fillet of Sole on another plate place spoonful of mixture on one end. 
  15. Starting with filled end, roll fillet.
  16. Place stuffed fillet in baking dish with "seam side" down.
  17. Stuff remaining Fillets of Sole.
  18. Sprinkle 1 Tablespoon Lime Juice or Lemon Juice on top.
  19. Bake for 22 Minutes in 350°F oven.
Serve with Rice + veggie.  Any pieces remaining can be covered/refrigerated and reheated in the microwave.

Do you stuff + bake Fillet of Sole?  So good!

Enjoy!
Yummy!