Showing posts with label zucchini. Show all posts

Wednesday, September 18, 2024

~Mid September~

Chilly mornings! Warm afternoons with the sun shining! It's mid September and it is a great time of year. The locally grown zucchini and tomatoes are still available to purchase from garden markets and road side stands in our area. Colorful Mums are also found at these markets. The yellow, maroon, white or lavender flowers add a great touch to the landscape around our homes.

Butternut Squash are also ready to purchase now! That veggie is a fave in my family, so a bushel (now packed in a carton) is always purchased. The orange veggies will be peeled/ steamed and packed away in our freezer to enjoy during the colder months. Yes, Butternut Squash will also find its way on our dinner table this week! 

It is a great time of year!
Enjoy!


Saturday, January 27, 2024

Raisin Zucchini Muffins

A Raisin Zucchini Muffin
(File Photo)

It's the weekend! A weekend in late January when our local grocery store had some fine looking Zucchini in the Produce Department. Very quickly a memory of freshly baked Zucchini Muffins popped into my mind.  To be specific- Zucchini Muffins with Raisins.  Yum!  Not since that "buy local" veggie was available at road side stands this past summer have I baked a batch.

Well, that changed today.  A double batch is now baking in my oven and the aroma in my kitchen is beginning to make me hungry.  I baked a double batch.  There will be Raisin Zucchini Muffins located in our freezer tomorrow, too.  

Click here for the recipe

When you also find some "fine looking" Zucchini in your grocery store's Produce Department, bake a batch of these very tasty treats!

Enjoy!
Yummy!          


Saturday, August 5, 2023

Veggie Sauce

Veggie Sauce
(File Photo)

It's the time of year to use my slow cooker (crock pot) to prepare Veggie Sauce!  It contains chunks of local Eggplant and local Zucchini and local Green Peppers along with canned tomato sauce and tomato paste.  After a quick walk to my spice rack the dried Basil and dried Oregano are added to the slow cooker's pot.  Dried Parsley is a great addition, too! Now, is when the local veggies are available at the roadside stands, farmers' markets and grocery stores.  It is good to "buy local" and support our local farmers!  The fresh veggies are so delicious, too! 

**When preparing this sauce if I have ground beef in the fridge, it is browned in a skillet, drained and also added.  I have learned over the years that with my slow cooker's "non stick" coating it is still always best to spray it with PAM, first.  Then, I add the Green Pepper Chunks.  If ground beef is used it is added to the pot second.  

I like to prepare this sauce with or without the meat.  It is easy to prepare and tastes so good.
Click here for the recipe.     

In the colder months it is always a treat to take out a container of this yummy sauce to defrost/ heat and serve over pasta for dinner.  Do you prepare foods to have "on hand" in your freezer, too?  They make great "take out" meals! Just reach into your freezer and take it out!

Enjoy!
Yummy!


Thursday, May 19, 2022

Grilled Chicken- Part 2

Grilled Chicken- Part 2

To some people the word leftovers is not appreciated much.  However, to me leftovers can be the beginning of another entree to be enjoyed at dinner.  For example, a few days ago grilled chicken tasted great!  I had a box of Kraft Mac & Cheese in the pantry and it paired so well with the chicken.  We enjoyed a vegetable, too.  Needless to say we had leftovers.

That brought another easy to prepare entree 2 nights later.  Two Zucchinis were cut into slices, then cut in half and sauteed.  Mushrooms were also cut into slices and you guessed- sauteed. (***Yes, I did rinse them under/ in cold water/ drained before slicing.)  The chicken was cut into small chunks and added to the large sautee pan along with the Mac & Cheese- to heat everything.  Then, I added about 2 ounces of water and stirred everything together.  Without the water it may have been a bit dry.    A quick trip to my spice rack for the Oregano and Basil.  Two shakes of each went into my sautee pan.  Then, a little more stirring.  Before I knew it we were eating dinner! 

This was one delicious dinner!! Two of the ingredients were leftovers!  Who would know??  

Now, this is a recipe that needs no specific written instructions.  It's a "use what you have", sautee some veggies, add water, Oregano and Basil.  Dinner was so good!!

Try it!
We enjoyed it!
Yummy!


Thursday, July 29, 2021

Grilled Zucchini

Grilled Zucchini

Warm grilled Zucchini halves always taste so delicious!  In the warmer months- like in the summer- this is a great side dish at dinnertime!  It is placed on our grill after being coated with Olive Oil, Basil and Oregano.  Sometimes, I add garlic powder, too.  It is so easy to prepare, grills quickly and tastes so yummy!  Any extra pieces are refrigerated.  The next night they are cut into smaller pieces and added to a veggie salad.   

If you have not enjoyed this very easy delicious side dish, add Zucchini to your grocery list or Farmers' Market list this week and try it.  The recipe is below: 

Recipe for Grilled Zucchini!     

Enjoy!
Yummy!           


Tuesday, June 18, 2019

Grilled Pork Tenderloin Flatbread

Grilled Pork Tenderloin Flatbread!
There had been just a few slices of grilled Pork Tenderloin on the serving platter after dinner.  Just a few was just enough!  Two days quickly flew by.  Suddenly, it was time to prepare another dinner.  I knew that on the second shelf of our fridge there was a container of Fat Free Ricotta cheese.  The packaged Flatbreads were located and fresh zucchini were ready to saute, also.  I envisioned another dinner- Grilled Pork Tenderloin Flatbread.  Yum!

So, 2 nights later dinner was quick and easy!   The 2 zucchini were sliced and sauteend on the stove.  Then, the FuN part started.  On a large cookie pan 3 Flatbreads were placed in a 375°F oven for 2 Minutes.  After removing from oven the layering starts.

Drizzling a little barbeque sauce (that has been diluted with a little water) over the top before adding the shredded cheese really adds that extra pizzazz.  If you have a few slices of grilled Pork Tenderloin remaining after dinner some night, save it to make Grilled Pork Tenderloin Flatbread for dinner.

Ingredients: 

Flatbreads- I use 3.
2 Zucchini-  sliced, then sauteed in Olive Oil with Basil + Oregano
1/4 Cup Ricotta Cheese (can be Fat Free)- for each flatbread
Grilled Pork Tenderloin- cut into small chunks
4 teaspoons BBQ Sauce
1 teaspoon Water
Shredded Cheese- desired amount

Method:
  1. Place Flatbreads on a large cookie pan.  Bake for 2 Minutes in a preheated 375°F oven. 
  2. Remove from oven.
  3. Slice and saute Zucchini in Olive Oil with Basil + Oregano.
  4. Place on top of Flatbreads.
  5. Cut grilled Pork Tenderloin into chunks.  Place on flatbreads.
  6. In a small container mix 4 teaspoons BBQ Sauce with 1 teaspoon water.
  7. Drizzle BBQ Sauce/ Water mixture on top of Flatbreads.
  8. Sprinkle desired amount of Shredded Cheese on top.
  9. Bake for 5 Minutes in 375°F oven.
  10.  Remove from oven.
  11. Cut each Flatbread into 3 or 4 slices.
  12. Cover & refrigerate any leftovers.
Ordering take- out pizza is easy, but after enjoying these Flatbreads, I would rather have this for dinner!  It is not difficult to prepare.  Just prepare all of the ingredients first.

Enjoy!
yummy!
               

Friday, August 25, 2017

Grilled Chicken Flatbread with Roasted Veggies

Grilled Chicken Flatbread
with Roasted Green Pepper & Zucchini
Sometimes, do you have a few slices of Grilled Chicken remaining after dinner?  Do you have a Green Pepper & a small Zucchini just waiting in the fridge?  If the answer is Yes, Flatbread Pizza might be in your future!  This summer whenever we have leftover Grilled Chicken I know we'll be having this for dinner in the next 2 days!  

In April I shared how yummy BBQ Pork Tenderloin Flatbreads with Roasted Asparagus are.  Roasted Asparagus & fresh Spinach were placed on top along with chunks of BBQed Pork Tenderloin.  What a quick, easy & yummy dinner!

The packages of Flatbread that I use have baking directions on the package.  I make 3 White Flatbreads.

***Roasting Veggies:  Rinse veggies under cold running water, pat dry & cut into slices or chunks.  After coating with baking & sauteing Olive Oil, Garlic Powder, Basil & Oregano, they are roasted in a 450°F oven for 15 minutes. 

Then it's time to start making the Flatbreads!

Ready for the oven!

Grilled Chicken Flatbreads
with Roasted Veggies

Ingredients: 
Flatbreads
***Roasted Green Pepper strips & Roasted Zucchini slices.
1/4 Cup Ricotta Cheese (can be Fat Free) for each Flatbread
Grilled Chicken cut into chunks
1 teaspoon Water
4 teaspoons BBQ Sauce
Shredded Cheese- desired amount to be sprinkled on top

Method:
  1. Place (3) Flatbreads in a large cookie pan & bake in a 375°F Oven for 2 Minutes. Remove from oven.
  2. Spread about 1/4 Cup Ricotta Cheese on each.  (I use Fat Free.)
  3. Place Roasted Green Pepper strips & Roasted Zucchini slices on each Flatbread. 
  4. Add Grilled Chicken, that's cut in chunks.
  5. In a small cup combine 1 teaspoon cold water & 4 teaspoons BBQ Sauce.  Mix well.
  6. Drizzle BBQ sauce mixture over the 3 Flatbreads.
  7. Sprinkle desired amount of Shredded Cheese on top.
  8. Bake for 5 Minutes at 375°F.
  9. Remove from cookie pan & cut each Flatbread into 3- 4 pieces.
Any extra slices are refrigerated for the next day's lunch!

These are so good & not full of dough!  Just topped with chunks of Grilled Chicken & Roasted Veggies!  With all of the local fresh produce at our roadside stands, fresh veggies are now in season!  

Enjoy!
Yummy!

Thursday, July 13, 2017

Tomato & Grilled Zucchini Salad

Tomato & Grilled Zucchini Salad

When preparing dinner I usually take out my iPad, place it on my kitchen counter & cook- using recipes on my blog or others I've saved.  There are countless yummy foods that I've posted that we like.  The ingredients are usually on hand, too.          

Now, it's the time of year to BBQ!  Zucchini is a veggie that we like sauteed, but during the warmer months it finds a place on our grill whenever we're grilling dinner.  Oregano, Basil & Garlic Powder added to the Baking & Sauteing Olive Oil give that veggie great flavoring!  Usually 3 or 4 Zucchini are prepared.  They are so good! 

One of the Grilled Zucchini are not eaten at dinner.  It's saved for Tomato & Grilled Zucchini Salad the next day!  This cold salad is just yummy with a little Balsamic Vinaigrette drizzled on top!

Tomato & Grilled Zucchini Salad

Ingredients:
1- 2 Grilled Zucchini, cold (Directions for grilling) 
1 Large Tomato- cut into chunks
Feta Cheese
Balsamic Vinaigrette

Directions: 
  1. Cut Grilled Zucchini into slices.
  2. Cut Tomato into chunks.
  3. Place into serving dishes.
  4. Sprinkle on Feta Cheese.
  5. Drizzle Balsamic Vinaigrette on top.
It's a delicious cold salad!

Enjoy!
Yummy!
        

Friday, July 15, 2016

Chicken Salad Platter

Chicken Salad Platter
Chunks of Grilled Chicken, juicy Nectarines & creamy Avocado resting on a bed of shredded lettuce!  Add a few whole Pecans, some shredded Red Cabbage & Carrots with Feta Cheese resting on top.  Now that is colorful!  Now that is so nutritious & yummy, too!

Then Raspberry Balsamic Vinaigrette drizzled on top.  This is definitely my kind of Salad Platter for dinner.  It's been HHH lately, so after enjoying Grilled Chicken, Grilled Zucchini & a microwaved "Baked Potato" one night at dinner, a cold Chicken Salad Platter the next evening is oh so good!

The OXO salad dressing shaker is filled with:

Raspberry Balsamic Vinaigrette
  • 1/4 Cup Balsamic Vinegar
  • 1/2 Cup Olive Oil for salads
  • 2 teaspoons Raspberry Jam or Jelly
Then, shake, shake, shake & shake that container again!
Repeat & repeat again until the Jam/ Jelly is dissolved.

If I had cold Grilled Zucchini left, I'd add it to the Salad platter, too! This is a great refreshing nutritious dinner on an HHH night!

Yummy!
Enjoy!

Wednesday, July 15, 2015

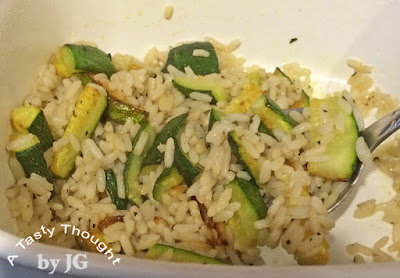
Zucchinied Rice


Zucchinied Rice
Fresh local Green Beans!  Zucchini!  Summer Squash!  Beets!  Wait, wait, let's go back to Zucchini.  Those green veggies.  Home gardeners learn quickly that they can grow very long & wide if they're not picked off their vines early enough.  Stopping into our local Farmer's Market last Thursday there was a large selection of small Zucchini.  It didn't take me long to select 8 of the smallest to enjoy this week.  Zucchini sauteed in Olive Oil is so good!

Earlier this week as I was prepping dinner, there was "leftover" cooked white Rice in the fridge.  I always prepare Rice that leaves me with about 1 cup left in the serving bowl after dinner.  (My method to cook Rice.)  That's never a problem- it's always saved to use again later in the week.  This cooked Rice was the beginning of a new side dish.  Suddenly it came to me- add sauteed Zucchini & heat.  

2 of the small Zucchini were cut into strips & then sauteed.  The white Rice had been cooked in chicken broth & seasoned with Basil.  It was so good!  Zucchinied Rice is a great side dish!  Try it!

Zucchinied Rice

Ingredients: 

2 small Zucchini
1 Tablespoon Olive Oil for sauteing & baking
about 1 cup cooked white Rice
1 teaspoon cold Water

Method:
  1. Rinse 2 small Zucchini under cold running water, dry.
  2. Cut off both ends.
  3. Cut Zucchini into 1 and 1/2" chunks.
  4. Cut each chunk in half.  
  5. Place long cut side down & carefully cut into 1/4"- 1/2" strips.
  6. Stack 3-4 larger strips & carefully cut to desired size.  Repeat.
  7. Heat Olive Oil in saute/ large frying pan.
  8. Add Zucchini strips & cook until tender, stirring often.
  9. Place cooked Rice + 1 teaspoon water in microwave safe bowl.
  10. Add sauteed Zucchini, stir & cover.
  11. Heat in microwave.
Who would think that this side dish had leftovers?  We will be having this again!  

Enjoy!
Yummy!
         

Wednesday, May 27, 2015

Grilled Zucchini

Grilled Zucchini
Warm weather & grilling time!  Woohoo!  I've been waiting for this- wearing short sleeved shirts, shorts & sandals.  And there's that added perk of prepping dinner to cook outdoors.  The teasing aroma from the grill each time that its lid is opened while food is cooking signals warm weather.  Grilled seafood, chicken & beef have been enjoyed this past week.  

On Saturday I "spied" Zucchini in the produce dept. of our grocery store.  Four smaller sized firm veggies were chosen.  It didn't take long to decide Grilled Zucchini would be the veggie that evening for dinner.  Yum!  Grilling Zucchini is easy & it tastes soo goood!

Basil, Oregano & Garlic Powder from my Spice Rack were combined along with Olive Oil for sauteing & baking to coat the Zucchini halves.  Then, they were grilled.

An extra Zucchini was grilled, too- it makes a great addition to a cold veggie dinner salad!  Cut in small chunks & add in.  Yum!

Grilled Zucchini

3- 4 small Zucchini
3- 4 Tablespoons Olive Oil for sauteing & baking
1/8 teaspoon Basil
1/8 teaspoon Oregano
less than 1/8 teaspoon Garlic Powder

Method:
  1. Combine Olive Oil, Basil, Oregano & Garlic Powder in baking dish or plastic bag.
  2. Rinse Zucchini under cool running water & dry.
  3. Cut 1/2" off each end (blossom end & stem).
  4. Then, cut each Zucchini in half- blossom end to stem end.
  5. Place each 1/2 Zucchini in Olive Oil combination.
  6. Coat each side of vegetable.
  7. Using tongs, place on heated grill, cut side down.
  8. Turn over to cook other side.
  9. Grill until soft- as desired.
  10. Grilling Time depends on heat of grill & distance from heat.  On our grill Zucchini is grilled in 15-17 minutes.
Any remaining slices can be refrigerated & added to a cold salad.

Enjoy!
Yummy!


Thursday, September 18, 2014

Roasted Zucchini/ Summer Squash

Where's the photo?!?
Sometimes there's just not a photo!  Those are the times when we are either famished or I just forget to take out the camera or the iPhone.  Last night was one of those times.

It was a very quick dinner.  Those frozen Crabcakes do come in handy!  Crabcakes with tartar sauce are always so good on a sesame seed bun.  You know the ole' combo- 1 Tablespoon Sweet Relish with about 1/2 teaspoon Mayonnaise & stir.  Making the Tartar Sauce was easy, but we also needed a veggie.  No, not French Fries.  Opening the fridge & looking down to the veggie bin, 2 Zucchini + 1 Summer Squash popped into view!  Roasted veggies are always so yummy, so I had my answer.  Roast the sliced veggies in the same cookie pan & at the same temperature as the Crabcakes while they were baking!  Now that our temps are a lot cooler, heating the oven & kitchen actually feels great!  During the HHH summer months I really do not do much baking!  

Roasted Zucchini + Summer Squash
     2 - 3 servings

2 Zucchini
1 Summer Squash

or 1 Zucchini + 2 Summer Squash

Method:
  1. Wash veggies under cool running water, dry.
  2. Cut into 1/2" slices.
  3. Using a container or Ziploc Bag, combine 2 Tablespoons Olive Oil + 1/8 teaspoon Oregano & 1/8 teaspoon Garlic Powder.
  4. Add veggie slices to bag & coat.
  5. Place coated veggies on cookie pan.  I placed them surrounding the Crabcakes
  6. Roast 20 Minutes at 450°F.
Zucchini & Summer Squash were added to my list to purchase at the roadside stand today.  I'll definitely be roasting these again as long as our local veggies are available!   :)  Try it!

Enjoy!
Yummy!
 

Wednesday, October 30, 2013

Currant Zucchini Muffins

Currant Zucchini Muffins
Did I really write currants?  Oh yes I did!

There were 2 Zucchinis remaining in my fridge, so this past weekend baking moisty muffins was a plan.  My "go to" recipe for these moisty yummy muffins is adapted from Janet Pierce's Zucchini Chocolate Chip Muffin recipe.  A few years ago I discovered it by googling and locating it on allrecipes.com.  I like the flour/ sugar ratio here - twice as much flour as sugar.   Whenever possible when baking/ cooking, I use Olive Oil, Egg Whites (2 Egg Whites = 1 Whole Egg) & Soy Milk, so there are changes.  No chocolate for me, either.  The recipe in hand, I was on my way!  

Raisins are always an ingredient in my Zucchini Muffins.  When I reached for the raisin canister, I discovered that my DH had snacked the day before.  No problem - there always is a Plan B!

Suddenly, I remembered that in my pantry there was an unopened box of currants that I use when baking scones.  The Currants (small Raisins) were added into the batter. What a great substitution!  

Currant Zucchini Muffins - 12 Muffins
Oven Temperature:  350°F

Ingredients:
1 and 1/2 Cups Flour
3/4 Cup Sugar
1 teaspoon Baking Soda
1 teaspoon Cinnamon
1/4 teaspoon Nutmeg
1/2 teaspoon Salt
2 Egg Whites, slightly beaten
1/2 Cup Olive Oil, for baking & sauteing
1/4 Cup Milk - I use Soy Milk.
1 Tablespoon Lemon Juice
1 teaspoon Vanilla Extract
1 Cup shredded Zucchini
1/2  Cup Currants

Method:
  1. Preheat oven to 350°F.
  2. Wash 2 small Zucchini in cold water and dry.
  3. Shred Zucchini to measure 1 Cup.
  4. In a large bowl combine dry ingredients, stir.
  5. In small bowl slightly beat Egg Whites.
  6. Add Egg Whites to dry ingredients.
  7. Add remaining ingredients.
  8. Stir until moistened & combined.
  9. Divide batter evenly between 12 muffins cups.
  10. Bake 28 minutes or until cake tester comes out clean.
  11. Remove muffins from pan and cool on cooling rack.
As the 12 muffins were cooling on the rack, suddenly 1 disappeared!   

They were so good! Currants will now always be an ingredient.  Now, there's a treat in our freezer - a 4 pack of Currant Zucchini Muffins in a Ziploc Freezer Bag.

Enjoy!
Yummy!

Wednesday, October 10, 2012

Freezing Butternut Squash

It's been a day filled with raindrops, but who would guess?    Glancing out my kitchen window the bright Mums are lookin' good!  Last fall we cut them back and mulched them...hoping they would make a comeback. 

It's October and some of my family's fave autumn veggies had been purchased and I was prepping them for our large freezer.  Butternut Squash!  Yum!  A tradition that started with my family during my childhood was preparing the delicious orange colored squash to place in our freezer to defrost/reheat to enjoy all year- whenever we wanted.  Well, until the year's supply evaporated.  That happens quickly!  We grew our Squash in one of our large gardens.   

Yes, Butternut Squash chunks can be purchased in a grocery store's frozen food department, but the purchased box/package may contain a combo of various winter squash - not really tasty unless Brown Sugar is added.  We enjoy the local veggie and we do not need to add any additional brown sugar.

This past weekend a large box of Butternut Squash was purchased at Meadowbrook Farm in East Longmeadow, MA.  After cutting off the skin of the veggie and steaming the chunks, it is mashed and then the yummy veggie is packed into 1- Quart Ziploc Freezer Bags.  Label and freeze.

Last year I posted the complete instructions:  Prepping Butternut Squash to Freeze

Butternut Squash Chunks
(File Photo)
It's worth the small amount of time and effort to prep and freeze this delicious vegetable.  The day before Thanksgiving Day, 2 packages are placed in my fridge to defrost.  They are reheated and find their place on our dinner table. 

An added plus is that I substitute the Butternut Squash for Pumpkin in recipes that call for Pumpkin.  Do you use this substitution?   

Yummy!
Enjoy!


Sunday, June 12, 2011

Sauteed Combo

While glancing through the Big Y's sales flyer last week the fresh New Jersey Zucchini and Summer Squash sure caught my attention!  In the summer one of our fave veggie dishes that goes so well with grilled fish is Sauteed Combo, so I purchased 3 small tender Zucchini and also 3 small yellow Summer Squash.  Fresh veggies are delicious!  This is a quick to make & yummy dish that does not need much attention.      

Sauteed Combo

Ingredients:
2-3 Tablespoons Olive Oil for Sauteing & Baking
3-4 small Zucchini &/or Summer Squash
1 Tomato
1/2 teaspoon dehydrated Parsley
Oregano, Basil & Garlic Powder - 2 shakes of each from the bottles in my Spice Rack


Method:
  1. Wash veggies in cold running water.
  2. Cut Zucchini & Summer Squash in slices.
  3. Heat Olive Oil in Saute skillet, Medium heat.
  4. Place Zucchini & Squash in skillet and saute.
  5. Sprinkle Parsley on top.
  6. Sprinkle on Oregano, Basil & Garlic Powder, as desired. 
  7. Saute until tender, turning slices over - usually 20 - 25 minutes.
  8. Cut tomato into chunks and add into skillet.
  9. Heat until tomato is warm.
There are enough remaining veggies in my fridge to enjoy this, again, tomorrow evening.  Before we know it, our local produce will be available.  :) 

Enjoy!
Yummy!


Thursday, April 28, 2011

Raisin Zucchini Muffins

Last week while glancing through my local grocery store's (Big Y) sales flyer it did not take me long to notice that the price was right on Zucchini!  I'm definitely a consumer who enjoys a good sale on food, on clothing and on household goods.  Always have and always will be! 

Zucchini is not "in season" here in MA, so chunks sauteed in Olive Oil was a wonderful veggie at dinner.  Yum!  It's also been MANY months since I 've baked Raisin Zucchini Muffins!  So ... 2 extra Zucchini were purchased to bake a dozen of these raisin filled treats.  I knew better than dream that I'd bake a double batch while also preparing for Easter. 12 moisty raisin filled muffins would fit the bill.  My longtime readers know that I do not always remember to take a photo of food.  However, yesterday there was 1 remaining muffin, so I quickly snapped a photo - before my hubby walked into our kitchen and it would be gone.  :)

This recipe is inspired by Janet Pierce's Zucchini Chocolate Chip Muffins on allrecipes.com  In my family it's always "all about the Raisins", so I used 3/4 cup.  After enjoying eating Hard Boiled Eggs this past weekend I'm back to using Egg Whites + Olive Oil when baking.    

Raisin Zucchini Muffins  inspired by Janet Pierce

Oven :  350°F  
Baking time:  28 Minutes
Yield:  12 Muffins

Ingredients:
1 and 1/2 Cups Flour
3/4 Cup Sugar
1 teaspoon Baking Soda
1 teaspoon Cinnamon
1/4 teaspoon Nutmeg
1/2 teaspoon Salt
2 Egg Whites, slightly beaten
1/2 Cup Olive Oil, for baking & sauteing
1/4 Cup Milk - I use Soy Milk.
1 Tablespoon Lemon Juice
1 teaspoon Vanilla Extract
1 Cup shredded Zucchini
3/4 Cup Raisins

Method:
  1. Preheat oven to 350°F.
  2. Place muffin liners in muffin pan.
  3. Wash 2 Zucchini in cold water and dry.
  4. Shred Zucchini to measure 1 Cup.
  5. In a large bowl stir together Flour, Sugar, Baking Soda, Cinnamon, Nutmeg and Salt.
  6. In a medium blow combine Egg Whites, Olive Oil, Milk, Lemon Juice and Vanilla.
  7. Add shredded Zucchini to liquid ingredients.
  8. Pour liquid ingredients into dry ingredients.  Add 3/4 Cup Raisins.  
  9. Stir until moistened.
  10. Divide batter evenly between the 12 muffin cups.
  11. Bake 28 Minutes or until cake tester comes out clean.
These muffins are very moisty.  They also freeze very well.  If you have extra Zucchini, bake these Cinnamon + Nutmeg flavored muffins.  They are so good!  After the photo was taken ... my hubby did walk away with it.  Luckily, I had placed 4 muffins in a Ziploc Freezer Bag and they are waiting in our freezer.  :)
   
Enjoy!
Yummy!
                      

Sunday, October 3, 2010

Zucchini Muffins

Many years ago more than a few gardeners would use some of their abundant Zucchini crop in baking Zucchini Bread.  Perhaps I had baked too many dessert breads of this particular variety to enjoy the taste any longer.  And then many years passed...  

Cupcakes are a dessert to be enjoyed on special occasions or "just because".  Quite often this past summer while I browsed through magazines, read articles and read other blogs, Zucchini Cupcakes with Cream Cheese Frosting recipes were appealing to and baked by many individuals.  I was ready to enjoy the taste of Zucchini as a dessert once again.  It has been a few years.  :)  Perhaps it'd be a good idea to ignore the Cream Cheese Frosting with the additional calories. 

I located many and baked three different recipes.  Each recipe I tried contained a lesser amount of sugar - it's that calorie thing, once again.  The last recipe that I baked (and have done many times this past summer) was located on allrecipes.com  Janet Pierce shared a recipe, Zucchini-Chocolate Chip Muffins that results in moisty delicious muffins.  Thank you!  She also shared that she freezes these muffins.  That was a selling point for me.    
This past week there were two green Zucchini in my fridge.  Considering that autumn has arrived, what better way to use these Zucchini than make a double batch of Zucchini Muffins?  I now use Janet Pierce's recipe, but do not include the chocolate chips nor the chopped walnuts.  I also substituted Egg Whites (2 Egg Whites equals 1 Whole Egg when baking), Olive Oil for Sauteeing & Baking and Soy Milk.  In my family it's always "all about the Raisins", so I added 3/4 Cup Raisins.  Plus about 1/8 tsp. Nutmeg.  A double batch of the Zucchini Muffins was baked with two-thirds of the baked goodies placed in my freezer.  The total baking time for 24 muffins was 28 minutes.

They are so good!
We are enjoying them!
Yummy!


Tuesday, July 6, 2010

Sockeye Salmon Will Be Grilled Tonight!

It’s July! It’s hot and humid outside! It’s time for fresh "wild caught” Alaskan Grilled Sockeye Salmon for dinner! My local grocery store (Big Y) is featuring this delicious, healthy, colorful fish in the Seafood Dept. Last Friday at dinnertime we enjoyed this very tasty dinner and tonight will be a repeat. Yummy!

The preparation is so easy. Neither fancy sauces nor salty additions are needed to accent the taste of this scrumptious fish. A metal grilling basket or container is needed. It prevents the fillet from dropping down into the grill. :)

Grilled Sockeye Salmon

  • Spray grilling basket (container) with PAM.
  • Heat grill.
  1. On a large dish pour about 2 TBS. Olive Oil.
  2. Sprinkle a little Paprika on top.
  3. Rinse a Salmon Fillet in running cold water, place on the Olive Oil/Paprika.
  4. Turn the fish over to coat the skin side.
  5. Place the Salmon Fillet in grilling basket on grill.
  6. Half way through, turn over and grill the other side.
  7. Enjoy!
  • The amount of needed grilling time depends on the size of the piece of salmon and the grill.
  • A 1 lb. piece requires 5 – 7 minutes on each side.
*** Note: With our grill we usually grill each side 7 minutes. The 1 lb. fillet is usually thick.

A microwaved “Baked Potato” and Sauteed Combo served along with Grilled Sockeye Salmon is a meal we enjoy often during the hot summer months. With the local Zucchini available at our roadside stands, it’s great to eat these colorful prepared fresh veggies.

This is another family favorite that I posted almost two years ago and we still enjoy this scrumptious dinner! I wait for our local grocery to have a special on this “Wild Caught” fish.

Do you/your family enjoy fish? Do you prepare it at home? Do you like Alaskan Sockeye Salmon?  It’s easy to prepare and tasty to eat!

Enjoy!
Yummy!

Friday, July 24, 2009

Sauteed Summer Veggies

Yes! The fresh, colorful, nutritious vegetables are now found at our local roadside stands. Last night the chilly rain was falling outside my kitchen window, but inside my warm kitchen the green chunks of zucchini squash smelled so good! I was sauteing them in Olive Oil. This quick and easy side dish is one that we enjoy often when the local zucchini is available.

After washing 3 – 4 small zucchini in cold water, they were cut in slices. Each slice was then cut in half. 2-3 TBS. of Olive Oil were heated in a large skillet over medium heat. While sauteing the veggies, I added a few sprinkles of dehydrated Chopped Parsley, Chopped Onion, Oregano, Sweet Basil and Garlic. Saute until tender. Ahhh!


Sometimes, I add slices of yellow Summer Squash along with sliced Green Pepper Sauteed Combo (click here). This is one of our favorite side dishes!


It tastes so Good!

Yummy!

Monday, August 11, 2008

Bow Tie Veggie Medley

In the warmer weather when the locally grown zucchini, green peppers and summer squash are available, I make Sauteed Combo (click on bolded words) quite often. It is definitely a treat to use the local produce. Sometimes, we have a small portion left after dinner, so the remaining amount is covered and placed in our fridge. This small portion combined with previously prepared Bow Tie Pasta is the beginning of another yummy side dish. Have you ever prepared a bit too much pasta? I usually do, just a bit. A few evenings ago Bow Tie Pasta was part of our dinner, and the extra pasta was also refrigerated. Those two enjoyable foods became the basis of Bow Tie Veggie Medley.

The pasta was reheated in a skillet with 1 TBS. Olive Oil. The extra Sauteed Combo was added along with 6 halved cherry tomatoes. A little Basil was sprinkled on top. What a delicious side dish! To think that it all started with leftovers from two dinners that we enjoyed three days ago.


Try it! Enjoy! Yummy!