Enjoy!
Tuesday, December 31, 2013
Monday, December 23, 2013
Merry Christmas!
Friday, December 20, 2013
~Christmas Sugar Cookies~
 |
| Christmas Sugar Cookies |
Did I mention that Sour Cream is an ingredient here? It is. Fat Free Sour Cream works very well in this cookie recipe that I've been using for over 30 years.
On Day 1 the dough is prepared and then wrapped and placed in the fridge, On Day 2 take your refrigerated dough out of your fridge and find your cookie cutters, colored sugared sprinkles, rolling pin & rolling mat and the fun begins.
 |
| Day 2 - Rolling out refrigerated dough! (File Photo) |
An added plus is that after baking & cooling they can be packaged and placed in the freezer. Bake these early and freeze until needed. However, remember that a taste test is always needed when baking cookies. With the wonderful aroma of nutmeg in your home there are sure to be taste testers to be found quickly.
Christmas Sugar Cookies
printable recipe card (click here)
Oven: 375°F
Yield: About 5 dozen, depending on size
Ingredients:
4 Cups Flour
1 teaspoon Baking Powder
1/2 teaspoon Baking Soda
1/2 teaspoon Salt
1/2 teaspoon Nutmeg
1 Cup unsalted Butter, softened
1 and 1/2 Cups Sugar
1 Egg
1/2 Cup Sour Cream (can be Fat Free)
1 teaspoon Vanilla Extract
Colored Sugars for Decorating
Method:
Day 1-
- In large bowl with electric mixer beat Butter and Sugar until light and fluffy.
- Add Egg, beat.
- Add in Baking Powder, Baking Soda, Salt and Nutmeg.
- While beating on Low, slowly add Flour, 1 Cup at a time.
- Add in Vanilla and Sour Cream. Beat on Medium until well combined. Dough will be stiff.
- Remove dough from bowl and place on plastic wrap, wrap dough.
- Place wrapped dough on aluminum foil and wrap well.
- Refrigerate overnight.
- Preheat oven to 375°F.
- Unwrap dough and cut into four parts.
- On well floured surface, roll dough to 1/4" thickness. Use cookie cutters.
- Place cookies on pan/sheet 1" apart. (Maybe 12 cookies to a sheet.)
- Sprinkle with colored sugars.
- Bake 10 - 11 Minutes. Bottom of cookies will be a light golden brown.
- Remove with spatula to wire cooling racks.
- When cool store in airtight containers.
Enjoy!
Yummy!
Labels:
Christmas,
cookies,
cooking with kids,
cutters,
desserts,
family favorite,
Fat Free,
freeze,
holiday,
Nutmeg,
overnight,
refrigerated,
rolling pin,
sour cream,
sprinkles,
sugar
Tuesday, December 10, 2013
Christmas Hermits
 |
| Hermits |
If you are searching for an easy to bake cookie recipe to share during the upcoming holidays, this is the recipe for you! Hermits are a long time family fave.
This cookie is baked in a large cookie pan. The stiff dough is separated into thirds. Make a roll (log) with each third of the dough before placing in the cookie pan. Flatten the roll - making sure the flattened rolls do not connect in the pan. Then top each roll with the beaten reserved Egg Yolk. This gives the Hermits the glossy topping after baking.
 |
| Before placing in oven. |
 |
| Ready for the taste test! |
Hermits printable Recipe Card
Oven: 375°F 23- 25 Minutes
Ingredients:
¾ cup solid Crisco Shortening
1 and ½ Cups Sugar
¼ Cup Molasses
2 Tablespoons Water
2 Eggs – (Reserve about 1 teaspoon for coating)
1 Cup Raisins
3 Cups Flour
1 teaspoon Baking Soda
1 teaspoon Cinnamon
1 teaspoon Ginger
½ teaspoon Ground Cloves
Method:
- Using mixer, beat Shortening, Sugar, Molasses & Water. Beat until creamy.
- Reserve about 1 teaspoon of Egg with a little Yolk. Add Eggs & beat.
- Now add Baking Soda, Spices & Flour. Flour is added ¼ cup at a time and mixed into batter, Otherwise you will be peering through a white mist. :)
- Fold in Raisins using big spoon or spatula.
- Spray PAM on a large cookie pan.
- Divide dough into three pieces. Make three rows of dough on
cookie pan, leaving about 1½ ” border on each end. Dough is very sticky. - Coat top with reserved Egg – use back of teaspoon to spread.
- Bake in preheated 375°F oven for 23- 25 minutes (25 minutes in my gas oven).
- Cool 15 minutes & cut into diagonals. I throw away end pieces- too hard after cooled.
- Remove from cookie pan and store in a container after cooled.
Enjoy!
Yummy!
Thursday, December 5, 2013
Time for Take Out!
 |
| African Violet blossoming! Woohoo! |
Take out of the freezer and defrost, that is! :) A meal containing Turkey sounded so good and there were 2 Ziploc Freezer containers of Turkey a la King just waiting. It was the day to remove one container from the second shelf. Turkey a la King freezes very well! Every year, without fail - on the third day after Thanksgiving Day, I cut the remaining slices & pieces of turkey into smaller bites to use while making a double or triple batch of Turkey a la King.
I use my Chicken a la King recipe - replacing the cooked Chicken with roasted Turkey. Click here for recipe. It's always best to remember the "food safety rule" of enjoying the delicious freshly roasted Turkey entree and then eating the remaining pieces of Turkey within 2 - 3 days after roasting.
Sure, Turkey Pot Pies can be made & enjoyed, but easy works so well for me, especially after a family holiday. The mix of veggies & Turkey in a thick white sauce served over toasted bread is so yummy! No need for any fuss of any kind.
 |
| (Turkey a la King - File Photo) |
On a busy night, defrost & heat. If using a covered vented sauce pot, heat on Low heat on the stove (with a little extra milk added). Stir while defrosting/ heating. Serve over toasted bread.
**This is a great time of year to purchase the Ziploc Freezer containers on specials at the grocery stores. They are very handy!
Enjoy!
Yummy!
Labels:
a la King,
broth,
chicken,
dinner,
easy recipe,
family favorite,
freeze,
take out,
Turkey,
vegetables,
Ziploc Freezer containers
Tuesday, November 26, 2013
~Pie & History~
There is an area in Chatham, MA across from the Coast Guard Small Boat Station and Chatham Lighthouse that overlooks the Chatham Sandbar. The tranquil scene and lighthouse are a "must see" for many visitors to this area. There are also interesting plaques containing history to read.
It begins-
 | |||
| (Click to enlarge.) |
The complete post- with images:
The Journey of the Pilgrims
posted November 21, 2012
History is FuN!
Today was "Pie Making Day" for me. One of my fam's fave pies - Butternut Squash Custard is below! Recipe
 |
| Ready to fill with the Butternut Squash Custard Filling! |
 |
| The hand mixer makes it easy! |
 |
| Soon to be refrigerated. |
Enjoy!
Yummy!
Labels:
butternut,
Chatham,
desserts,
dinner,
family favorite,
MA,
pie,
Pilgrims,
Plymouth,
Pumpkin,
squash,
Thanksgiving,
vegetables
Friday, November 22, 2013
Baked Apple Butternut
 |
| A serving spoon full of steaming Baked Apple Butternut! |
There were 2 Butternut Squash left in the cardboard carton. I had Cortland Apples. I had plans! The Cornflower CorningWare dish was located and I was good to go! Yes, I still have my treasured Cornflower. They do last a lifetime! The combination of baked Butternut Squash + baked Apples is delicious! Add in the Cinnamon & the Nutmeg - ah, great flavor! In this recipe softened Butter/ Margarine is combined with the spices + a little flour and Brown Sugar.
The addition of 1/4 Cup of Craisins or Raisins or a combo of both would be so tasty here and also colorful! However, a baking dish of Apple Crisp with Craisins/ Raisins was in our fridge, so the Craisins & the Raisins did not make the cut here.
 |
| Before covering with foil & placing in 350°F oven. |
Oven Temperature: 350°F Time: 60- 70 Minutes
Ingredients:
2 Butternut Squash
2- 3 large Apples (Cortland, Empire or Granny Smith)
****
2 teaspoons Flour
1/4 teaspoon Cinnamon
1/4 teaspoon Nutmeg
1/3 Cup Brown Sugar
3 Tablespoons softened Butter/ Margarine
Method:
- Spray a 10" x 10" Baking Dish with PAM.
- Preheat oven to 350°F.
- Rinse Butternut Squash & Apples under cool running water, dry.
- Cut off stem & rounded top of Squash, toss.
- Cut long portion of Squash into slices. Cut off peel. Then cut into 1" chunks.
- Remove seeds from bottom and cut remaining Squash into pieces.
- Place Squash chunks/ pieces in Baking Dish.
- Peel & slice Apples.
- Place Apple slices on top of Squash in Baking Dish.
- In small bowl, combine remaining ingredients for topping.
- Place topping on Apple Slices.
- Cover with Aluminum Foil.
- Bake in preheated 350°F oven for 60- 70 minutes, or until Squash chunks are tender. Use fork to pierce.
This is a yummy side dish! The flavors blend well together. After our dinner, the extra portions were packed in Ziploc Freezer containers/ labelled and into our freezer they went. What a welcome surprise at dinner this will be on a cold windy bleak winter New England night!
Do you serve Butternut Squash? It's always on our Thanksgiving Day Dinner table!
This weekend I'll be baking the Yummy Apple Breads and freezing them!
Enjoy!
Yummy!
Labels:
apples,
baked,
butternut,
CorningWare,
Cortland,
dinner,
easy recipe,
side dish,
squash,
Thanksgiving Dinner,
vegetables
Friday, November 15, 2013
Simple Soup & Sandwich
 |
| Tomato Basil White Bean Soup & Grilled Cheese n Tuna Sandwich |
All of the ingredients for Tomato Basil White Bean Soup (recipe here) were found quickly. As some of the ingredients including canned plum tomatoes cut in pieces, chicken broth, tomato sauce, Basil & Garlic Powder were simmering, my griddle pan was located.
Grilled Cheese on oatmeal bread is a fave here & sometimes I add tuna when making it - before grilling. For a number of years, tuna packed in olive oil is our preferred choice. Some of the oil is drained from the can, before mashing the tuna. I skip adding the mayo here and just add the tuna into a sandwich. Quite often when turning a Grilled Cheese n Tuna Sandwich over while grilling, a little tuna sneaks out onto my griddle. No longer will that happen!
The magic? Add a little shredded cheese into the mashed tuna before placing it on the bread slice. The shredded cheese heats, melts and keeps the tuna together. It's also a little extra cheese in the Grilled Cheese n Tuna Sandwich. What a great taste!
It was so good along with the Tomato Basil White Bean Soup! It was also very easy!
We did enjoy!
Yummy!
Labels:
Basil,
cheese,
College Inn Chicken Broth,
dinner,
easy recipe,
fish,
grilled,
olive oil,
seafood,
soup,
tomato,
tuna,
white kidney beans
Friday, November 8, 2013
Butternut Squash Breads
 |
| Butternut Squash Breads cooling. |
I don't purchase them. As I mentioned in my previous post, my family always had a large garden when I was growing up. The Butternut Squash we harvested was always enjoyed as a veggie at dinner and also in quick breads. You know, those breads where the ingredients are mixed together quickly in a large bowl and then baked in a loaf pan. They are quick! They are easy! They are yummy!
Butternut Squash has a great flavor. It is not bland and it's a wonderful ingredient to use rather than pumpkin in many recipes! I always bake 2 Butternut Squash Breads - one to enjoy now and the other is wrapped & placed in my freezer. Baking this bread now and freezing one loaf gives me a start on Thanksgiving!
- The recipe below is for 2 breads. If one bread will be baked, cut the recipe in half.
- I use Egg Whites whenever possible when baking/ cooking, less Cholesterol.
2 Egg Whites = 1 Whole Egg. - Olive Oil for sauteing & baking works very well here.
Oven: 350°F Time: 55 Minutes 2 Loaves
Ingredients:
3 Cups Flour
1 teaspoon Salt
2 teaspoons Baking Soda
2 teaspoons Baking Powder
2 teaspoons Cinnamon
1/2 teaspoon Nutmeg
1/4 teaspoon Ground Cloves (optional, but delicious)
2 Cups Sugar
8 Egg Whites (= total of 4 Whole Eggs)
1 & 1/2 Cups Olive Oil for sauteing & baking
2 Cups Butternut Squash (cooked, mashed & cooled - defrosted if frozen)
Method:
- Spray 2 large bread pans with PAM.
- Preheat oven to 350°F.
- Combine all dry ingredients in large bowl.
- In smaller bowl, beat Egg Whites until frothy.
- Mix in Olive Oil.
- Add mashed Butternut Squash to Egg Whites/Olive Oil & stir.
- Pour liquid mixture into dry ingredients and stir until combined.
- Pour batter into bread pans.
- Stagger bread pans on oven shelf.
- Bake at 350°F for 55 Minutes or until toothpick or cake tester comes out clean when inserted in middle of loaf.
- Remove from oven and cool in pans on wire rack for 10 Minutes.
- Remove from pans and continue cooling on wire racks.
- Cool completely before slicing.
***I substitute Butternut Squash for Pumpkin. However, if you have no Butternut Squash, this is a moisty easy bread using Pumpkin. No mix needed. :)
Enjoy!
Yummy!
Labels:
butternut,
dessert,
easy recipe,
egg whites,
family favorite,
olive oil,
Pumpkin,
quick,
squash,
Thanksgiving
Thursday, November 7, 2013
~Butternut Squash~
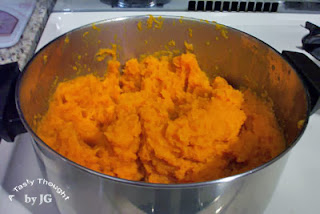 |
| Mashed Butternut Squash ready to place in freezer bags. |
This "project" has become a tradition. Butternut Squash is just delicious after it has been cooked. No sugar nor spices are needed to enhance the taste! While growing up, my family always raised this veggie and froze it. Living in an apartment so many years ago in Hampden, MA, my DH & I had a large veggie garden. Our landlord knew of my desire to grow our veggies, so he plowed a section of his rich soil side yard for us to plant our crops. It was great! That was all B.C. = Before Children! Time moves on! Now, I purchase the local fresh veggies when they in season and continue to freeze them.
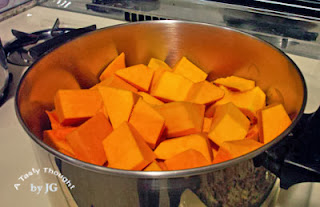 |
| Cut peeled chunks |
Butternut Squash
- Rinse/clean the Butternut Squash under cold running water.
- Dry.
- Using a cutting board & a sharp knife, cut off & toss the stem and rounded top.
- The long top portion is cut into slices. The slices are circles.
- Cut the peel off & discard.
- Cut each peeled circle into 2" chunks and place in large Dutch Oven/ pot.
- The lower portion containing seeds remains. Remove the seeds with a spoon.
- I save as much of the orange vegetable as possible that surrounds the seeds. Cut off the peel.
- Cut into pieces & place in Dutch Oven/ pot.
- Add cold water to container (so it reaches about 2" up in the pot)
- Turn the heat to High.
- After a Boil is reached, lower the heat and simmer about 13 - 15 minutes, until pieces can be pierced with a fork.
- During the cooking minutes, carefully stir the Squash pieces often in the pot, so they soften equally.
- Drain the squash using a colander.
- Return the chunks to the large pot and mash.
15. Cool until comfortable to pack in Ziploc Freezer Bags.
16. Pack about 2 Cups of mashed Squash in Ziploc Freezer Bags.
17. After labeling, store in freezer.
 |
| File Photo |
Do you serve Butternut Squash? Have you frozen it? It's very tasty!
Enjoy!
Yummy!
Labels:
butternut,
buy local,
DIY,
freezing,
Meadowbrook Farm,
preserving,
squash,
Thanksgiving,
tradition,
vegetables,
Ziploc Freezer Bags
Thursday, October 31, 2013
Wednesday, October 30, 2013
Currant Zucchini Muffins
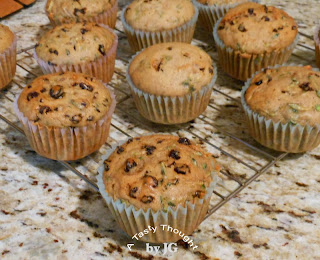 |
| Currant Zucchini Muffins |
There were 2 Zucchinis remaining in my fridge, so this past weekend baking moisty muffins was a plan. My "go to" recipe for these moisty yummy muffins is adapted from Janet Pierce's Zucchini Chocolate Chip Muffin recipe. A few years ago I discovered it by googling and locating it on allrecipes.com. I like the flour/ sugar ratio here - twice as much flour as sugar. Whenever possible when baking/ cooking, I use Olive Oil, Egg Whites (2 Egg Whites = 1 Whole Egg) & Soy Milk, so there are changes. No chocolate for me, either. The recipe in hand, I was on my way!
Raisins are always an ingredient in my Zucchini Muffins. When I reached for the raisin canister, I discovered that my DH had snacked the day before. No problem - there always is a Plan B!
Suddenly, I remembered that in my pantry there was an unopened box of currants that I use when baking scones. The Currants (small Raisins) were added into the batter. What a great substitution!
Currant Zucchini Muffins - 12 Muffins
Oven Temperature: 350°F
Ingredients:
1 and 1/2 Cups Flour
3/4 Cup Sugar
1 teaspoon Baking Soda
1 teaspoon Cinnamon
1/4 teaspoon Nutmeg
1/2 teaspoon Salt
2 Egg Whites, slightly beaten
1/2 Cup Olive Oil, for baking & sauteing
1/4 Cup Milk - I use Soy Milk.
1 Tablespoon Lemon Juice
1 teaspoon Vanilla Extract
1 Cup shredded Zucchini
1/2 Cup Currants
Method:
- Preheat oven to 350°F.
- Wash 2 small Zucchini in cold water and dry.
- Shred Zucchini to measure 1 Cup.
- In a large bowl combine dry ingredients, stir.
- In small bowl slightly beat Egg Whites.
- Add Egg Whites to dry ingredients.
- Add remaining ingredients.
- Stir until moistened & combined.
- Divide batter evenly between 12 muffins cups.
- Bake 28 minutes or until cake tester comes out clean.
- Remove muffins from pan and cool on cooling rack.
They were so good! Currants will now always be an ingredient. Now, there's a treat in our freezer - a 4 pack of Currant Zucchini Muffins in a Ziploc Freezer Bag.
Enjoy!
Yummy!
Labels:
breakfast,
currants,
easy recipe,
egg whites,
muffins,
olive oil,
Soy Milk,
squash,
zucchini
Saturday, October 19, 2013
~Halloween Sherbet Punch~
If you are planning a Halloween Party, pumpkins just the right size will be purchased! Food is also in your plans. For a yummy punch that is enjoyed by children of all ages, look no more! Halloween Sherbet Punch is the one for you. 2 ingredients - that's all you need to have your guests ladling more of this tasty frothy orange colored beverage into their cups. Orange Sherbet and 7Up make one great brew! *I use Diet 7UP.
Get your punch bowl ready for these ingredients:
Ingredients:
For each 1 Quart of Orange Sherbet
Use 2 Bottles 7Up - 2 Liter size bottles (refrigerated)
Method:
This brew has been a family fave for many years. A treasure much like the plastic spider on our table is. Our grandson now points out to others that the spider is "not real".
Enjoy the Halloween Brew!
Yummy!
Get your punch bowl ready for these ingredients:
Ingredients:
For each 1 Quart of Orange Sherbet
Use 2 Bottles 7Up - 2 Liter size bottles (refrigerated)
Method:
- In a large punch bowl place 1 Quart Sherbet.
- Pour 2 bottles 7Up Soda in punch bowl, pouring some over Sherbet.
- Stir a little to mix. Results in frothy, softened Sherbet on top.
- Ladle into cups adding some of the Sherbet.
- Replenish the 7UP + Sherbet, as needed.
This brew has been a family fave for many years. A treasure much like the plastic spider on our table is. Our grandson now points out to others that the spider is "not real".
Enjoy the Halloween Brew!
Yummy!
Labels:
7UP,
beverage,
easy recipe,
family favorite,
Halloween,
punch,
sherbet
Monday, October 14, 2013
Apple Crisp with Craisins/ Raisins
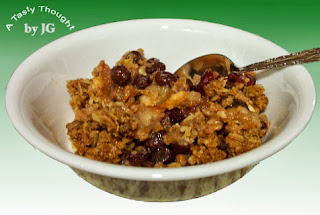 |
| Small scoop of Vanilla Ice Cream will be added! |
Last weekend we ventured west on the MA Pike and then on to upstate NY to attend a beautiful wedding. Driving on the highways between gorgeous trees that were beginning to change colors was so sweet - shades of greens, yellows & reds.
On the return trip home we not only viewed the colorful foliage, but at a rest/food area there was a Farmers' Market. An abundance of the fresh local apples from the nearby orchards were available to purchase. Cortland Apples! Cortland will always be my fave eating & cooking apple. The contents of a fill your own bag of these juicy tasty pieces of red fruit is now in our fridge.
My plan? Bake Apple Crisp with Craisins/ Raisins! A crunchy oat topping covers slices of fresh peeled fruit in this yummy dessert. The apple slices are also surrounded by sprinkles of Craisins & Raisins. Add in Cinnamon & Nutmeg = Yum! It's extra easy, because no pie crust is required for this tasty dessert!
Apple Crisp with Craisins/ Raisins
Oven Temperature: 375°F
Time: 45 - 50 Minutes
Ingredients:
6 - 7 peeled sliced large apples
3/4 Cup Brown Sugar
1/2 Cup Flour
1/2 Cup Old Fashioned Oats
3/4 teaspoon Cinnamon
3/4 teaspoon Nutmeg
1/3 Cup + 1 Tablespoon softened Butter or Margarine
1/4 Cup Craisins
1/4 Cup Raisins
Method:
- Preheat oven to 375°F.
- Spray PAM in 8" x 8" glass baking pan.
- Rinse apples under cold running water & dry.
- Peel & slice apples.
- Place peeled sliced apples in pan.
- Add Craisins & Raisins and mix in.
- Thoroughly mix remaining ingredients together in small bowl.
- Sprinkle over apples.
- Bake 45- 50 Minutes or until apples are tender.
- Serve warm or chilled with a small scoop of vanilla ice cream.
- When cool, cover & refrigerate any leftovers.
Enjoy!
Yummy!
Labels:
apples,
autumn,
cinnamon,
Cortland,
craisins,
cranberries,
crustless,
dessert,
easy recipe,
fall,
family favorite,
Nutmeg,
October,
pie,
Quaker Oats,
raisins
Monday, October 7, 2013
Cream of Wheat ~Banana Flavored
Yes! There were enough cereal granules in the Cream of Wheat box to prepare 2 servings. The directions on the box are followed.
However, there definitely are changes as to the ingredients. 1 overripe Banana cut into thin slices is added to the 1 quart sauce pot containing the Cream of Wheat granules. Soy Milk rather than Whole Milk or Water is used. 1/8 teaspoon each of Cinnamon + Nutmeg is added in, also. Turn on the Medium heat and you're on your way to start stirring!
Cream of Wheat ~Banana Flavored is great! Calcium, Potassium + Cinnamon & Nutmeg.
Enjoy!
Yummy!
Thursday, September 26, 2013
Marinated Green Beans
 |
| Green Beans simmering on my stove. |
The crispy green colored beans make a great side dish salad the next day. Now, this brings back memories for me - prepping 3 Bean Salad for summer picnics.
With the colder weather just around the corner, I'll be using the frozen packaged purchased variety, soon, and will microwave it. The larger bag will give me a few extra for Marinated Green Beans!
Do you purchase the fresh Green Beans when available?
Enjoy!
Yummy!
Labels:
buy local,
green beans,
Light Italian Dressing,
marinated,
salad,
vegetables,
Wax Beans
Saturday, September 21, 2013
Yummy Apple Bread
 |
| Apple Breads cooling! |
It's also the time of year when I bake Apple Bread. The aroma of this yummy "quick" golden colored dessert bread just floats from my kitchen as it bakes. The combo of Apples, Cinnamon, Nutmeg & Orange Juice is so good! I use Egg Whites & Olive Oil (for sauteing & baking) as substitutions for Whole Eggs & Vegetable Oil. 2 breads are baked at once. It's tradition - The 2nd bread has always been placed in the freezer - after it is cooled and wrapped in foil. It usually finds its way as a "gift" for a friend.
Apple Bread
click for printable recipe card
Oven: 350°F Time: 65 Minutes Makes Two Loaves
Ingredients:
4 Cups Flour
2 Cups Sugar
1 & ½ teaspoon Salt
2 teaspoon Baking Powder
1 teaspoon Baking Soda
1/2 teaspoon Cinnamon
1/8 teaspoon Nutmeg
****
2/3 Cup Olive Oil (for baking & sauteing)
2 Cups Orange Juice
4 Egg Whites
2 Cups finely chopped peeled Apples (5- 7 Apples depending on Apple size)
Method:
- Combine dry ingredients in a large bowl.
- Add Egg Whites (slightly beaten), Orange Juice and Oil and stir.
- Add chopped Apple and stir well.
- Spray PAM into two large loaf pans.
- Pour batter into greased pans.
- Bake at 350°F for 65 minutes or until toothpick comes out clean
when inserted in middle of loaf. - Cool on wire rack for 10 minutes.
- Remove from pans and continue cooling on wire racks.
Enjoy!
Yummy!
Labels:
apples,
bread,
desserts,
easy recipe,
egg whites,
olive oil,
orange juice,
quick,
Thanksgiving
Tuesday, September 17, 2013
Craisin Creamy Oatmeal
There was a definite chill in the air this AM! Frost is already mentioned for tonight! I guess it's time to pack away the comfy shorts and find those denim jeans. Yes, it is mid September and it's right on schedule, but I'd rather not admit it!
While waking up to the cooler air, suddenly a bowl of creamy hot oatmeal came to mind. O.K., last week during the 94° F day this idea would not have been good. This AM = Yum!
Craisin Creamy Oatmeal is filled with old fashioned oats and is my fave cereal. Adding those tasty dried cranberries to the oats along with Cinnamon, Nutmeg & Brown Sugar makes for a yummy, hearty breakfast! Soy Milk works well for me, and also for this hot cereal. I follow the basic directions on the Quaker Old Fashioned Oats canister, then add a little magic! No Salt needed!
Craisin Creamy Oatmeal
2 servings
Ingredients:
1 Cup Old Fashioned Oats
1- 2 Tablespoons Brown Sugar, optional
1/4 Cup Craisins (Dried Cranberries)
1 and 3/4 Cup Soy Milk (or Milk)
1/8 teaspoon Nutmeg
1/8 Teaspoon Cinnamon
Method:
Fiber & Calcium at breakfast is the best!
Enjoy!
Yummy!
While waking up to the cooler air, suddenly a bowl of creamy hot oatmeal came to mind. O.K., last week during the 94° F day this idea would not have been good. This AM = Yum!
Craisin Creamy Oatmeal is filled with old fashioned oats and is my fave cereal. Adding those tasty dried cranberries to the oats along with Cinnamon, Nutmeg & Brown Sugar makes for a yummy, hearty breakfast! Soy Milk works well for me, and also for this hot cereal. I follow the basic directions on the Quaker Old Fashioned Oats canister, then add a little magic! No Salt needed!
Craisin Creamy Oatmeal
2 servings
Ingredients:
1 Cup Old Fashioned Oats
1- 2 Tablespoons Brown Sugar, optional
1/4 Cup Craisins (Dried Cranberries)
1 and 3/4 Cup Soy Milk (or Milk)
1/8 teaspoon Nutmeg
1/8 Teaspoon Cinnamon
Method:
- Place all ingredients in a 2 quart sauce pot.
- Let stand 8- 10 Minutes.
- Heat to a boil over Medium heat.
- Stir & cook for 5 Minutes.
- Divide between 2 bowls.
- Add additional Soy Milk (Milk) & enjoy!
Fiber & Calcium at breakfast is the best!
Enjoy!
Yummy!
Labels:
Big Y,
breakfast,
cinnamon,
cooking with oats,
craisins,
cranberries,
Milk,
Nutmeg,
oats,
Quaker Old Fashioned Oats,
Soy
Tuesday, September 10, 2013
Tomato Basil White Bean Soup
 |
| Tomato Basil White Bean Soup |
A couple of weeks ago, when we were in Philadelphia, we enjoyed staying at the Hyatt Regency at Penn's Landing, located near the historic district and also on the Delaware River! The hotel's restaurant had a tasty menu. We ordered a cup of soup to start with that evening. It had a simple name. Yet, it also sounded so yummy - White Bean and Tomato Soup.
A steaming cup of the tomato base soup was filled with Cannellini Beans (White Kidney Beans) and Basil. It did not take long to devour it or for me to decide that after we returned home I would use my Dutch Oven to prepare a batch. It was quite easy to decide what ingredients to use in this yummy soup. They are all staples in my kitchen!
Rice is a great side dish with grilled fish, and the previous evening we enjoyed White Rice with Grilled Sockeye Salmon. The day I prepared this soup there was a bit of prepared "leftover" Rice to add to this very yummy soup.
Tomato Basil White Bean Soup
4 Servings
Ingredients:
1 can (14.5 ounces) Fat Free & Lower Sodium Chicken Broth
(College Inn)
2 ounces Water
1 can (15 ounces) Tomato Sauce
1 can Tomatoes, drained - If using whole tomatoes, cut into eighths.
1 can (15 ounces) Cannelli Beans (White Kidney Beans)
1 Tablespoon Dehydrated Onion
1 - 2 teaspoons dried Basil
1/4 teaspoon Garlic Powder
****
1/2 - 3/4 cup Prepared Rice - optional
Method:
- Place all ingredients, except Cannelli Beans & Rice, in large pot or Dutch Oven.
- Bring to a boil.
- Simmer for 10 minutes.
- Drain Cannelli Beans & rinse in cold water, drain again.
- Add to other ingredients in Dutch Oven.
- Add previously cooked Rice & simmer 4- 5 minutes.
- Enjoy!
***If the Prepared Rice has been added, a small amount of water will need to be added when reheating the soup. The Rice absorbs the liquid.
On a chilly cold evening, this easy to make Tomato Basil White Bean Soup will be a "go to" recipe for me. It's also so good with the "leftover" Rice added in.
Enjoy!
Yummy!
Labels:
Basil,
beans,
Cannellini,
College Inn,
Hyatt Regency Penn's Landing,
kidney,
rice,
soup,
tomato,
white
Subscribe to:
Posts (Atom)


